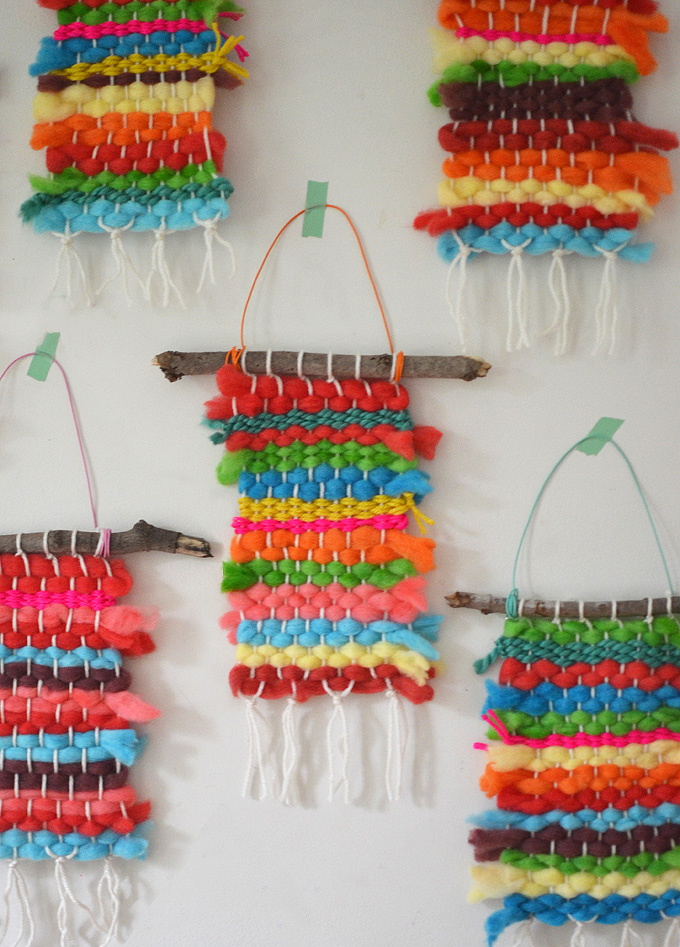
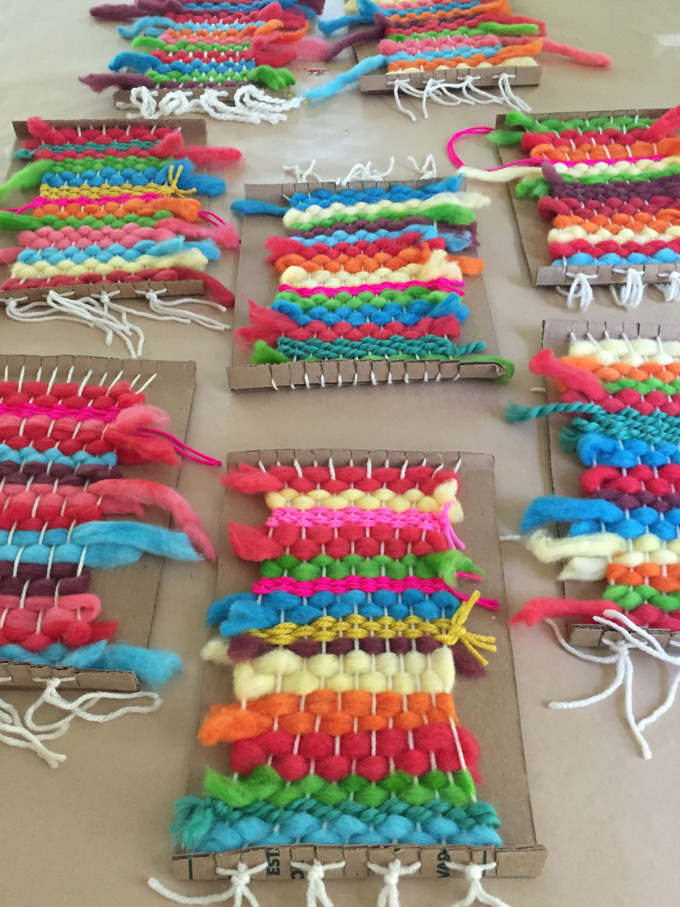
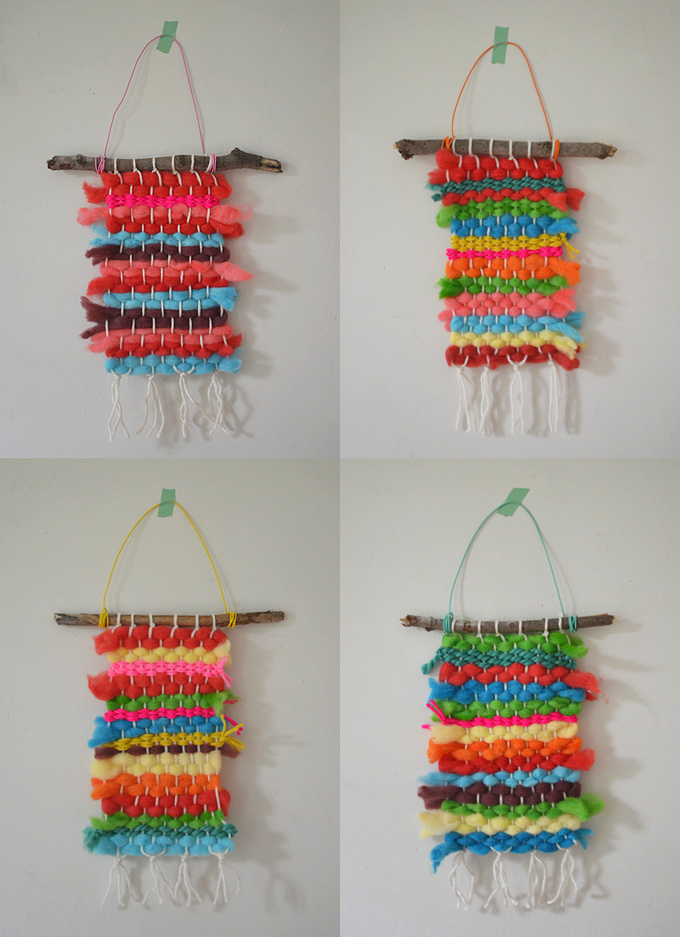
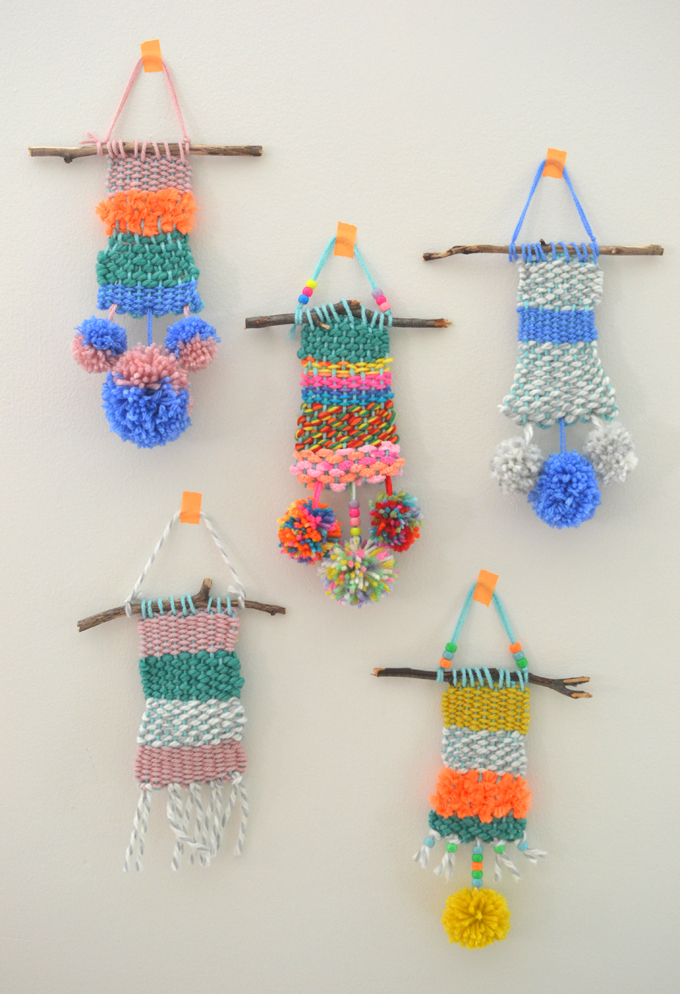
I am so in love with these rainbow weavings that the kids made in Art Bar camp!! And since we used Koolaid to dye the yarn, they smell very fruity, too 🙂
I’ve always wanted to make these, ever since I saw the amazing weavings from an art teacher named Jan. Hers are much more earthy and delicate. I love them! But there are no links anywhere on her blog so I couldn’t find the exact wooly yarn that she used. I tried to send her a message through her blog, but never heard back. And I can’t seem to find her on social media. So, Jan… if you ever read this, tell me what yarn you used, and THANK YOU for the incredible project!!
[ I am a participant in the Amazon Services LLC Associates Program, an affiliate advertising program designed to provide a means for us to earn small fees at no cost to you by linking to Amazon.com and affiliated sites. ]
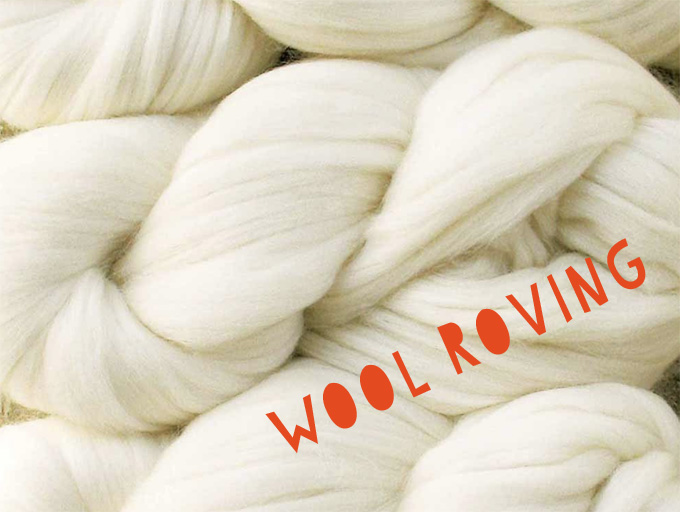
I didn’t do a good job photographing the “before”. In summer art camp, often things are moving at a fast pace with so many things happening all at once, I forget to pick up my camera. The most important supply is the yarn, which is called wool roving. The picture above is of the one I bought – and you can see the pack on the table below. It’s very easy to separate into thick strands and even easier to dye!
Supplies Needed for Rainbow Weavings
~ Wool roving (I used one bag for this group of 8 children)
~ Koolaid
~ Plastic containers to hold the dye and wool (don’t need lids, the wool only sits in there for an hour or so)
~ Cardboard pieces for looms
~ Scissors
~ Yarn to create the warp
~ Twig for hanging
~ Wire for hanging (we used Twisteez colored wire, but you can use yarn if you don’t have wire)
Dyeing the Wool with Koolaid
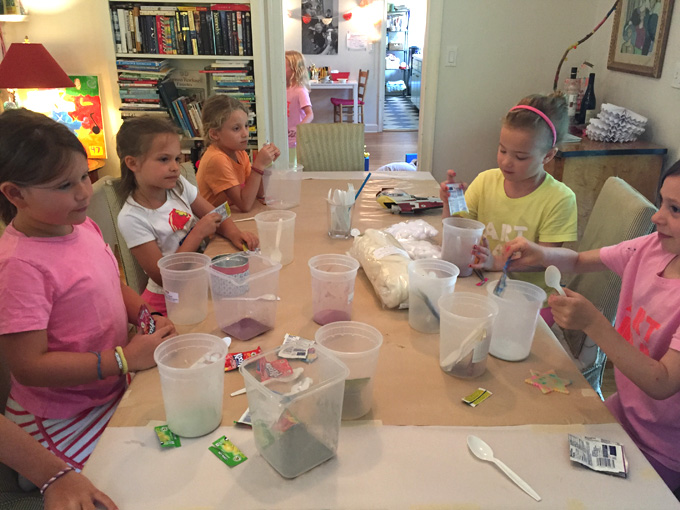
Step 1: Separate the Koolaid packets into the different containers (one packet per container, or you can mix some colors – here is a great post about mixing colors). Once you know how many containers you will end up with, you can separate the wool roving into equal sections.
Step 2: Add warm water to the containers and dissolve the Koolaid. We added about a cup of water so that the “dye” stayed intense.

Step 3: Add the wool to each container, stirring to make sure all of the wool is submerged. Let sit for an hour or so.
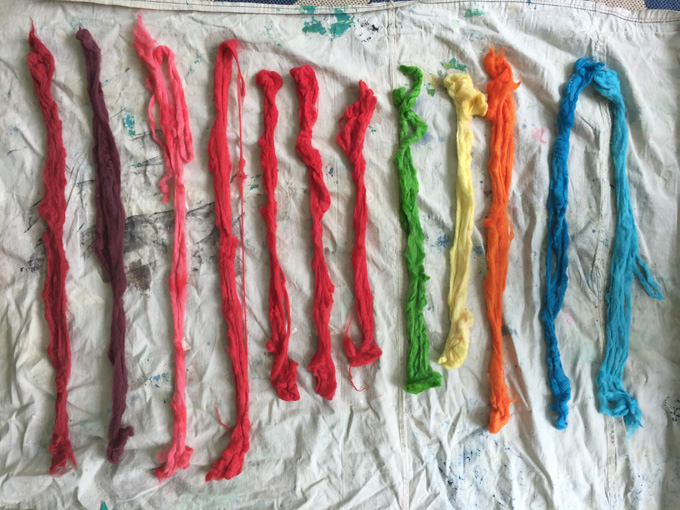
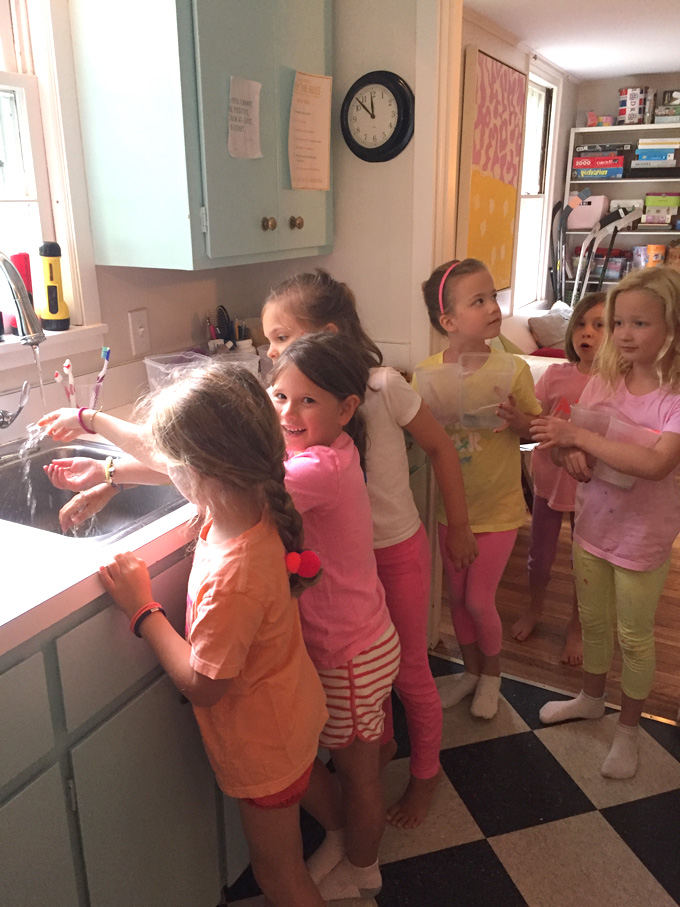
Step 4: Take wool out of container, run under water to squeeze out the excess Koolaid. Let dry overnight on a tarp.
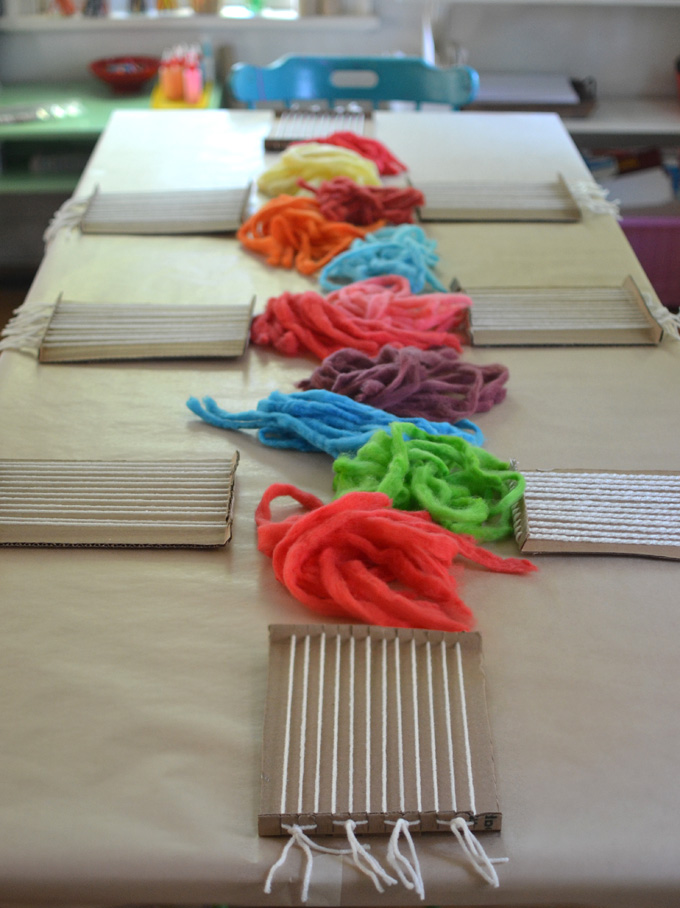
Step 5: Cut into smaller pieces and prepare the table for the weaving project.
How to Make the Cardboard Loom
We’ve made cardboard looms before, check out this post. These are slightly faster to make.
Step 1: Cut cardboard into a rectangle. No particular size, it all depends how big you want to make your weavings. I cut ours to about 6″ X 9″.
Step 2: Fold the ends up. The best way to do this is to “score” the back with an exacto knife and a ruler – which means lightly cut so there is a straight line. You can use an open scissor, too, if you don’t have an exacto.
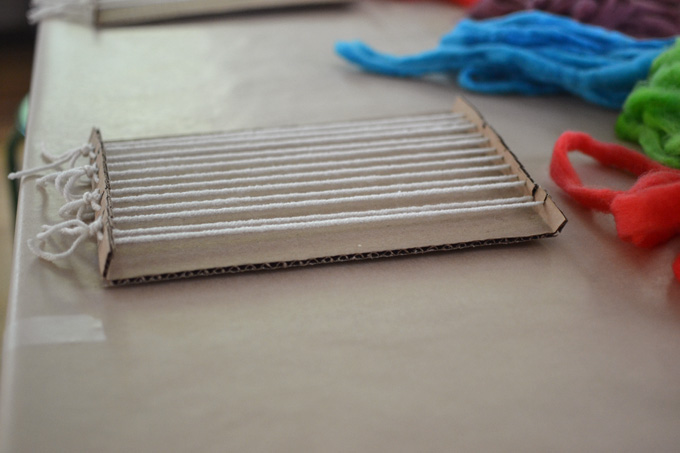
Step 3: Make 12 (or more if your loom is bigger but keep an even number) cuts on the folded part.
Step 4: Add string for the warp. I taped them on the back at the top, and then knotted them at the bottom.
How to Make a Rainbow Weaving
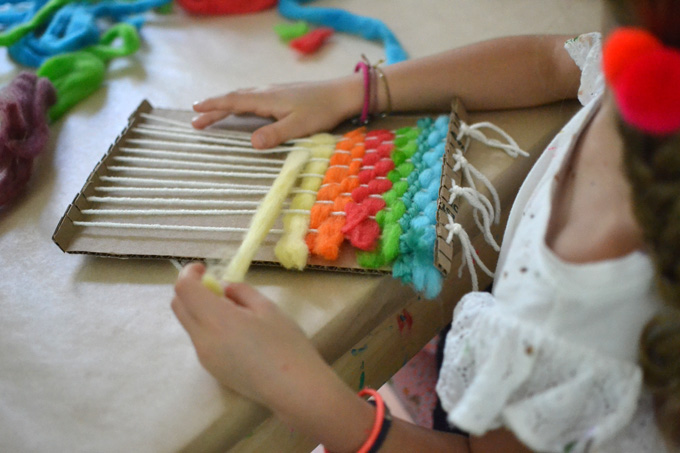
Step 1: Kids can choose their own pattern of colors. I teach them the “over and under” technique and they understand pretty quickly. It’s always a good idea to walk around and check their work as sometimes they will drop a warp thread. I also put out some regular yarn and we talked about breaking up the pattern and texture to create more interest. Not all kids went for that, but some did!
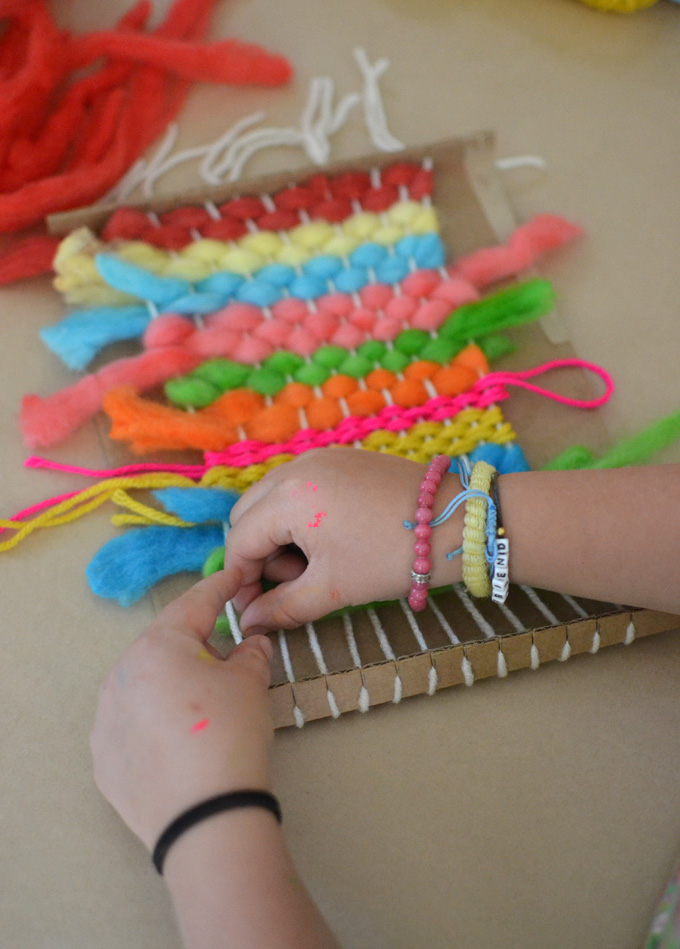
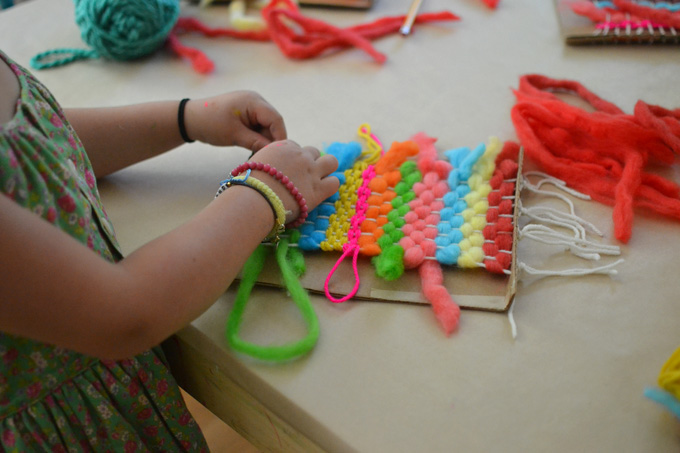
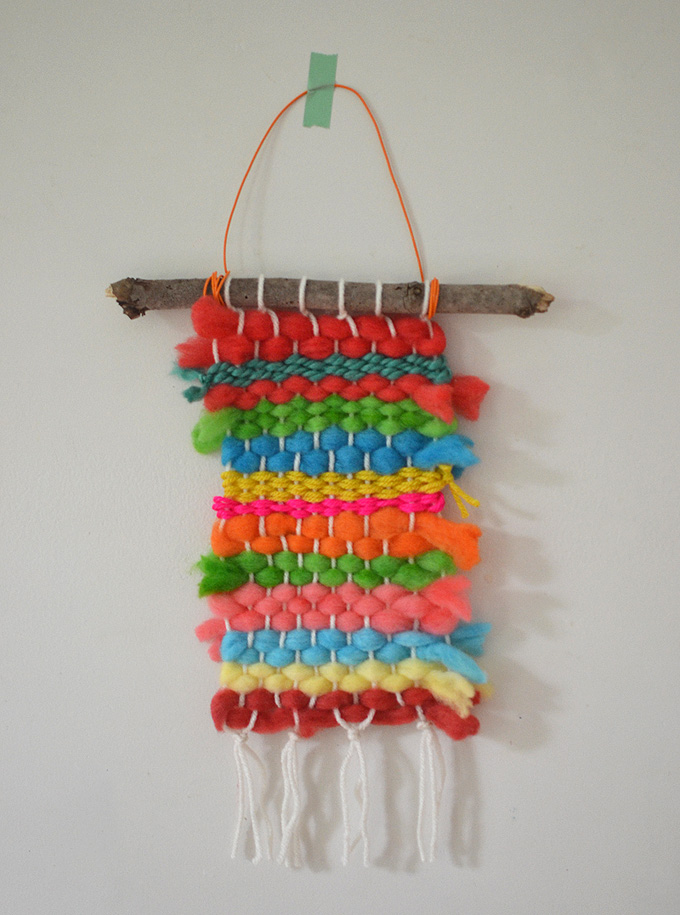
Step 2: When finished, a grown-up needs to do the rest. I don’t have any pictures of the process of taking the weaving off the looms and attaching them to the twig. But basically, the bottom is all set – you can just pull it off and the warp is already tied. For the top, after you take it off the loom, twist each pair of warp threads, then tie it around the twig, leaving the knot in the back. Trim the knots.
Step 3: Trim any of the chunky yarn the is hanging out too far. I really like the unruly edge and some of the kids wanted me to trim more, but I tried to explain to them that it was supposed to look organic. Again, with older kids they get so used to making things “perfect” (I believe this is learned in school, unfortunately) that it’s hard for them to accept and be OK with things that aren’t straight. I have this thought that as soon as they brought them home, they probably trimmed some more!
Step 4: Lastly, attach a hanger. It can be wire or string, doesn’t matter.

I’m dying to do this project again on a bigger scale, and with hand-mixed colors. Maybe make them ombre using shades of the same color. Wouldn’t that be so cool?
Let me know if you have any more questions!
XO, Bar
– – – – – – – – – – – – – – – – – – –


What Jan used looks more like carded wool (off a sheep or other wooly animal) than spun yarn. It looks a lot like the wool my sister used to cut off one of her llamas periodically (but cleaner).
These are beautiful! I’m wondering if you did anything to “fix” the dye? Will it rub off on the wall? Just remembering kool aid getting on my fingers and if course people using it for hair dye!
Thanks
hi Marianne, no I didn’t use a fixative. this was all experimental. I did rinse the dye out of the wool with hot water then color water, so they probably won’t run off on the wall. but adding a little salt would help… next time! xo Bar
Do you mean add the salt when rinsing? Or add the salt to the koolaid when coloring the yarn?
Thanks.
I don’t think I mentioned salt, but you can add salt to the dye while the yarn is soaking to keep the color more permanent. I didn’t do this step because these weavings will never be washed so I wasn’t concerned about dye running.
this is SUCH a great project!! I am thinking of doing this with younger kids. Do you think 5-7 year olds could do this? Also I noticed in the reply above you said you’d add salt at the end…why would you do this? 🙂 Thank you so much! I’ll try to send pictures from this project this summer.
yes I think 5-7 year olds are the perfect age. I added salt to keep the colors from bleeding. do let me know if you try, would love to see the results!! xx Bar
These look fabulous! How long did the weaving part take? I’d love to create these in one of my kids workshops but we only have about 45 mins of actual creating time. Would that be long enough you think?
Thank you for such creative inspiration… xx
hi Beck, so the weaving part took about half an hour. It went quickly because the yarns are thick. I think you will be able to do it in your 45 minute time frame! – Bar
I just dyed my wool roving and the colors are not nearly as bold. They are really light. I used just one cup or less of water and the entire packet of koolaide. I bought this wool roving at JoAnn Fabric and it says 89% acrylic and 11% polymide on the back. Could this be causing the problem with the dye process? I would love bold colors like yours. Thanks!! Melissa
hi Melissa, I’m afraid that the wool needs to be 100% wool. if it’s a synthetic fiber it will not absorb the die! so sorry! try again and use the link I gave on amazon for the pure wool. xx Bar
I love this! They are so bright and beautiful! You said one bag per 8 children. Was the one bag what you got from that Amazon link? Unfortunately, this would be much too expensive to do with a while grade level of children at school. But I will think creatively about how to get similar results with other materials. Thanks for your wonderful projects!
hi Emily, I believe so – it was a while ago. and I have a bunch left over, so you could probably stretch it to more like 10-12 kids. and if you split them in half (so skinnier yarn) then you could double the amount of kids. hope this helps! xx Bar
Thinking that thicker wool would make this friendly to possibly the 4-5 age range? What do you think? I don’t want them to get frustrated, but want them to experience the tactile feeling of weaving with wool vs paper.
definitely! their interests and fine motor ability will vary. some might need help. but some will love it and be very capable of finishing! I’ve done weaving with 4-5 year olds and that is my experience. good luck! xx bar
I love this project! Was wondering if it would work to make mini rugs for kids to sit on at group time? Maybe if we put a border around it with a thick ribbon or bright colored duck tape?
hmmm, I think if you used just ready-made yarn, but like the really thick yarn, that would be better. I worry about the dye coming off on their clothes when they sit. but I do love the idea of personal mini rugs made by hand!!!
Thus is great! Having taught for 30 years, I am a little offended by the remark about school. I never expected perfection on creative projects, and I’m quite certain that I am not alone.
I think this could be made with strips of cotton T shirt as long as they are cut wide enough to create the bulk needed. Thanks for this great project
Would you be so kind as to post a photo of the BACK of one of these weavings? I am the visual leaner here – must SEE to do! Thanks!
Learner
Not leaner! 😂
hi Susan, the back actually looks the same because the ends are loose, not tucked in the back. Does that make sense? It’s visually the same. ~ Bar