Do you have any special childhood memories of playing with a dollhouse? Dollhouses are probably one of the most essential, open ended, imaginative toys any child could play with. What if you could build, design, and play with your very own custom dollhouse? Let me talk you through all the ways you can make this happen right in your dining room, or even on the front porch!
Read Dollhouse Camp Part Two when you are finished.
And Dollhouse Camp Part Three is now out, which includes a FREE printable guide to setting up your own dollhouse camp!

{ This post was written by my lovely contributor, Shannon Merenstein of Hatch art studio. }
I love to think about longer term projects (meaning: completed over several sessions or days) for kids. It engages them in so many important skills like problem solving, innovating, imagining, planning, and more. If you’re looking for a project that strengthens those creative thinking muscles AND is contained inside a house-shaped box, I think you’re going to love doing this at home! I’m going to share this dollhouse camp process with you in two parts.
TODAY IS PART ONE!
SUPPLIES NEEDED FOR DOLLHOUSE CAMP (PART ONE):
~ Wooden dollhouse from IKEA
~ Acrylic paint (we used Martha Stewart colors, but these are similar and cheaper)
~ Brushes
~ Dollhouse template (hand draw)
~ Markers
DOLLHOUSE CAMP PROCESS, STEP BY STEP:
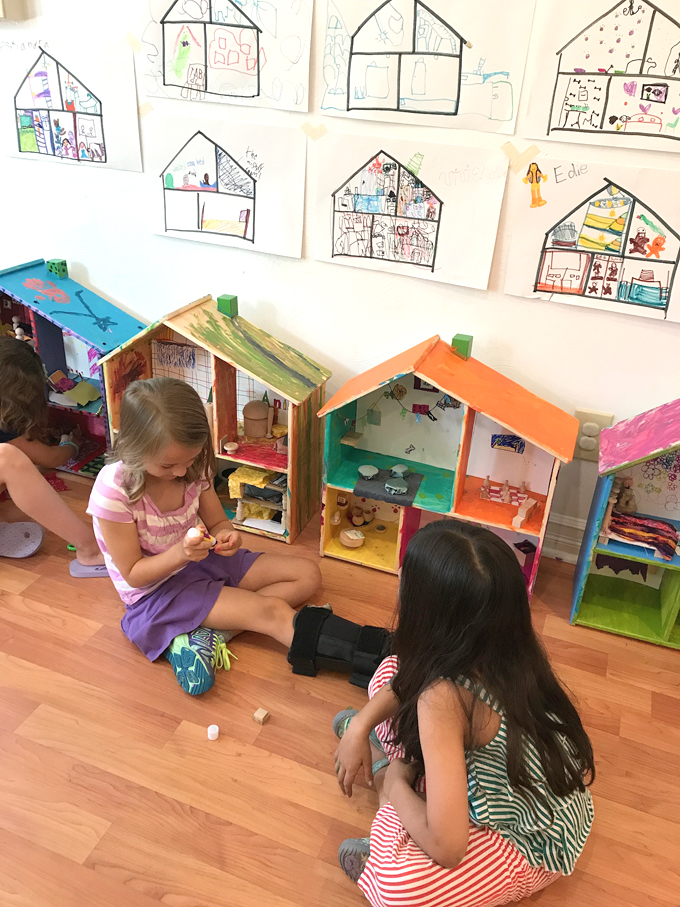
Assemble The Dollhouse
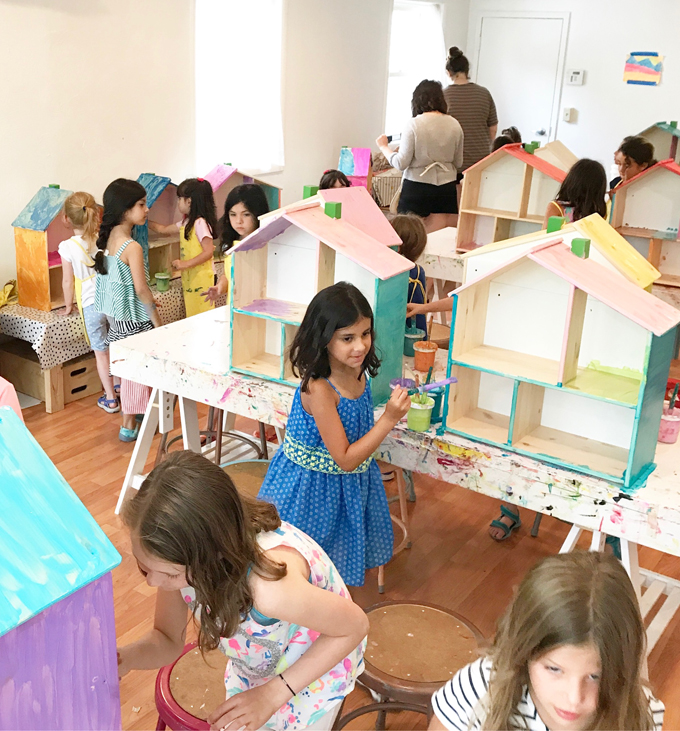
If you’re working with older kids who can use a screwdriver, or you want to work together, this can be a fun activity all on its own! These IKEA dollhouses are pretty simple to put together but since we had 23 dollhouse designers, I decided to enlist in help before the kids arrived.
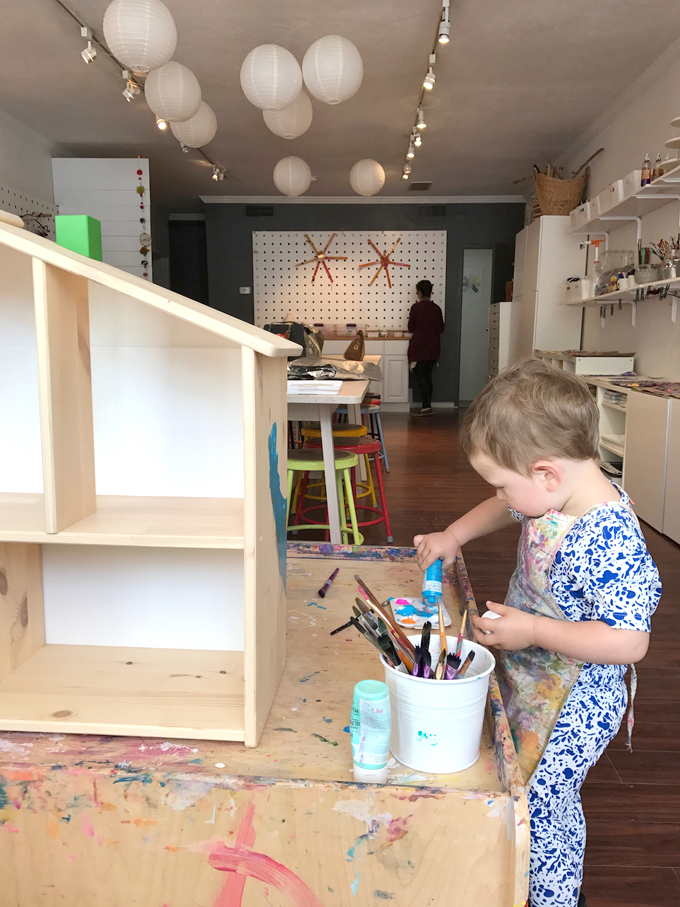
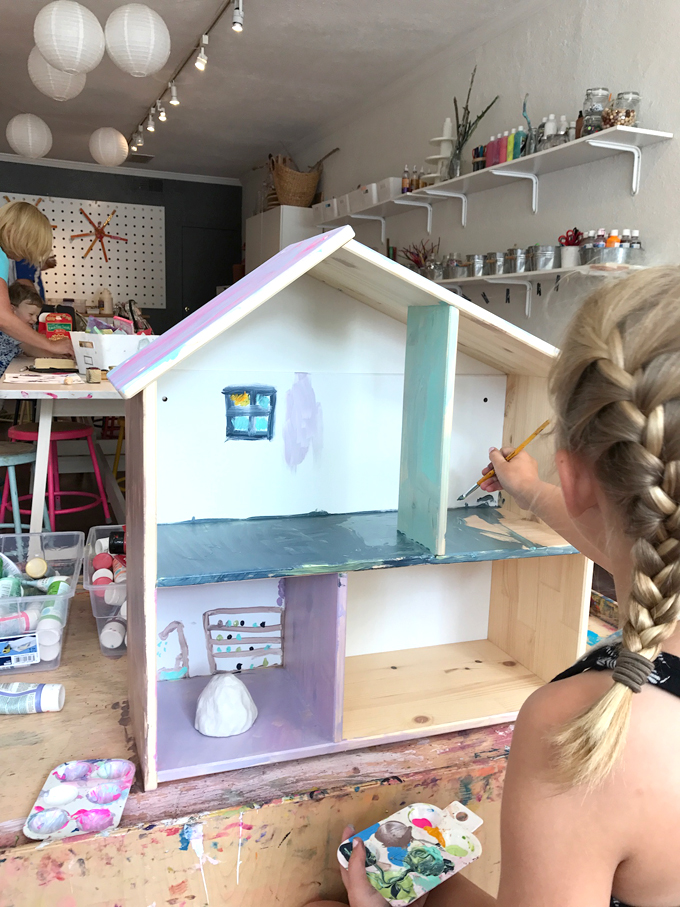
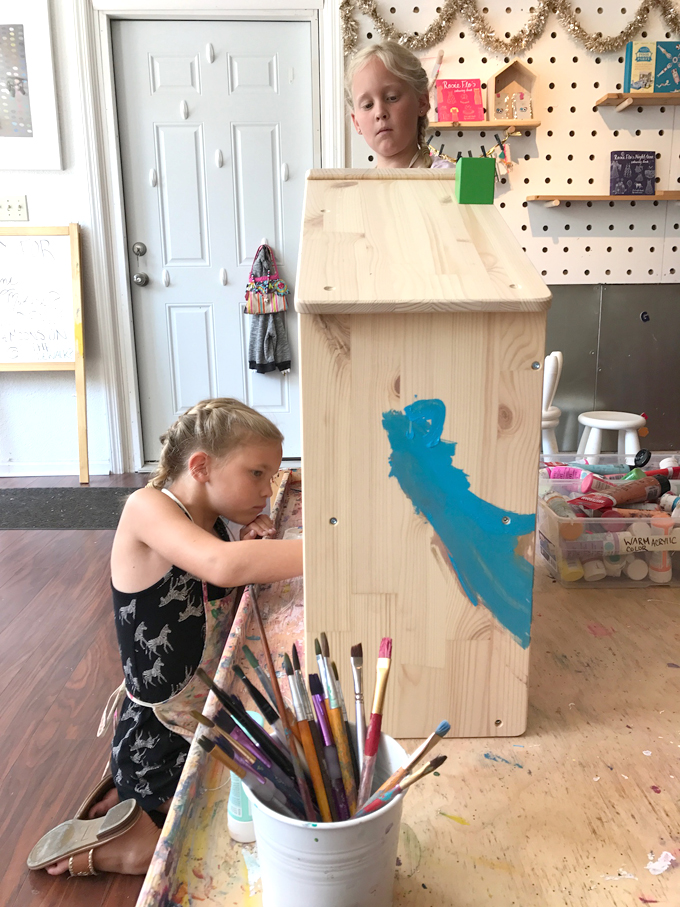
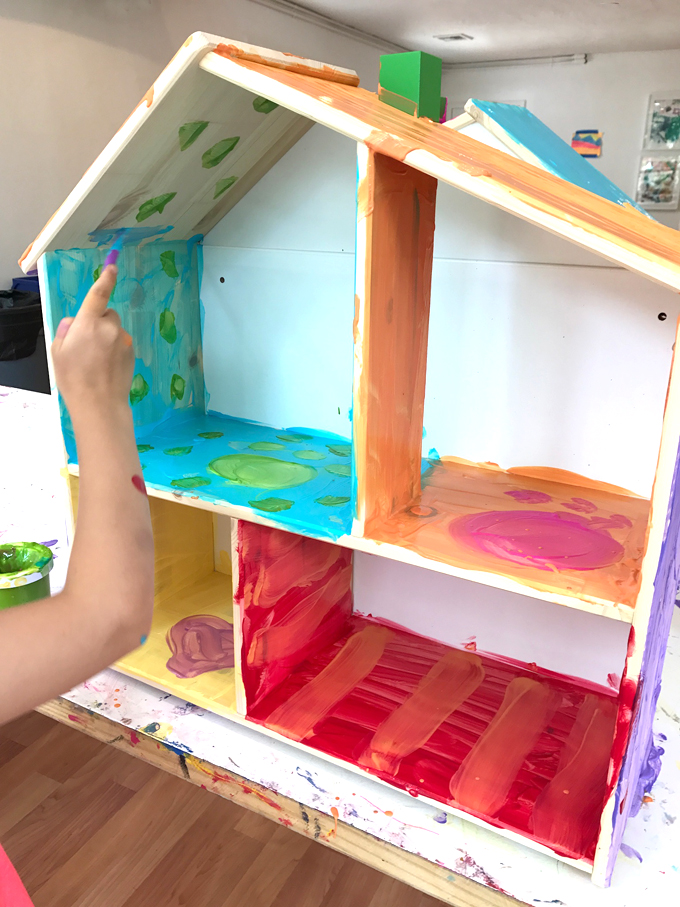
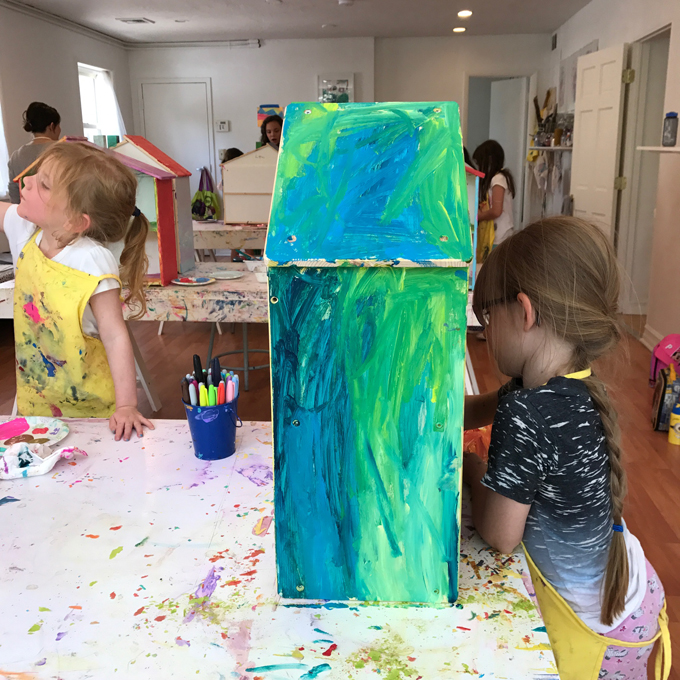
Start Painting
For younger kids, and/or once this step is complete, invite your child to begin painting the dollhouse. What colors will he or she choose for the outside? How about the inside? I encouraged everyone to paint all of wooden sections, and for the most part we left the white fiberboard in the back blank (because we’ll be wallpapering that later).
Full disclosure, I attempted this with tempera first and it flaked right off! Yikes! So, cover your surfaces with newspaper/drop cloth and go with acrylic, and you won’t even need to sand anything before hand.
I love the little containers of Martha Stewart acrylic paint. The colors are totally gorgeous, and you really only need one coat. The paint is super thick, so don’t be afraid to get brushes a little wet to help it spread a bit. Depending on your little artist’s interests, you could talk about blending different colors, creating patterns like stripes, dots, paw prints, or just working on covering big areas with different brushstrokes. I’ve painted many garage sale dollhouses with kids before, and believe me when I say that this is SO incredibly fun for all ages. Even my two-year old got in on the action!
(See Bar’s dollhouse mansion that her students made in art camp!)
Be sure to check out Dollhouse Camp Part Two!
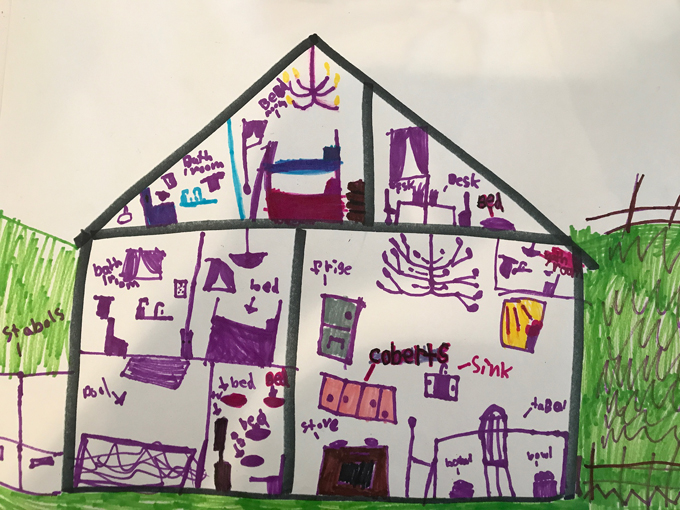
Create a Blueprint or Floor Plan
The next day, or whenever you’re ready to move on, have your child create a blueprint or floor plan for what they would like to create inside the house.
I drew the house for them by mimicking the shapes you see in the IKEA dollhouse and then provided the kids with markers and pens to fill in the details. You could try drawing the house together or providing a template, it’s totally up to you!
This is such a great learning opportunity and it crosses many disciplines. Writers create rough drafts, designers build prototypes, artists dash out little sketches, and architects imagine great big buildings using blueprints. It’s almost like a map. Some children really hunkered down in this step, exploring and documenting every little detail.
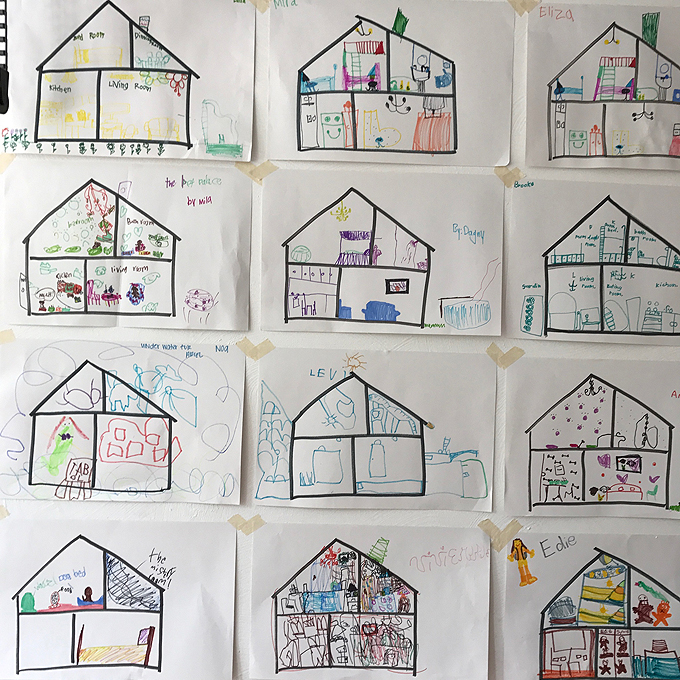
The blueprints really helped me think about the materials I would later provide the kids during the furniture and accessory building phase (Part Two). As the facilitator, I was able to think through what they might need to turn these dreams into reality. The plans really provided some authenticity in this project. But don’t let these elaborate designs intimidate, you won’t need a ton or materials. Kids are so resourceful when invited to create and build on a miniature scale!
In Dollhouse Camp Part Two, I’ll show you how to create custom wallpaper with your young designers. We’ll also talk about building furniture and accessories using loose parts and tinkering. I seriously can’t wait!
Until next time…
xo, Shannon
– – – – – – – – – – – – – – – – – – –
A little about Shannon:
Shannon Merenstein is the owner, creative director, and lead educator at Hatch. She is endlessly inspired by the creativity, joy, and imagination of children. Shannon returned to the wonderful city of Pittsburgh after graduation from Pratt Institute, where she studied painting and art education. For the past 8 years, Shannon has been an art educator and instructional coach at the Environmental Charter School in Pittsburgh, all the while dreaming up and testing out new and creative art projects for her children. When she became a new mom last March, the inspiration for Hatch started to emerge. Looking for creativity-building experiences for her son, Graham, Shannon saw a need for a studio like Hatch in the city. When they stumbled upon a former gallery in Point Breeze, Shannon and her husband, Cole, envisioned a beautiful space to inspire and activate creative thinking! Part art-making studio, part community-gathering space, Hatch aspires to be a special place in Pittsburgh for people of all ages to explore, create, and imagine.
Follow Shannon on Facebook and her beautiful Instagram.


Hi, would you be wiling to give me some idea of how much you charge for a class/classes like this one? I’m in The Bahamas and I would love to do something like this!
hi Alexis, I think it depends on what your community can afford. I would first calculate your costs. The dollhouses plus any paint and other supplies. Then decide how many hours it will take (Shannon did this camp over a period of many days, for a total of about 6 hours). Then decide how much you need to make per hour, or per kid, or per day. It’s all flexible. I hope this helps! xo Bar
Its really helpfull. I do lots of actities like this with my kids but its a lovly reminder.thanks
Hi there! I have been anxiously awaiting the Part Two of the Dollhouse Camp. Is it here someplace and I’ve missed it or are you still working on that part? Thank you!!!!
hi Kendra, no you have not missed it yet…. we moved this month so I’m just behind on blogging. it’s coming soon, probably second week in Sept. xx Bar
Okay, thank you! Hope move went well!
Anxiously awaiting part 2! Thank you for sharing your inspiration!
I swear it’s coming soon! xx Bar
Yay! 🙂 So glad I discovered your blog. So excited to share some of these ideas with our students at our studio in Pennsylvania. Please check us out themakerypa.com. If you are in the area pop in. It’s right up your alley!
for sure I will come visit if I’m close! we are college visiting this year so we may end up in your area. Where exactly in PA?
Was there a dollhouse for each kid or it was a shared activity?
hi Karin, there was a dollhouse for each kid.
Hi, I’m interested in knowing what you had the kids do during the camp; was the whole day spent on the house? or were there other activities to break up the day? Thanks!
hi Sarah, according to Shannon, the kids have camp from 9 to 12 for half-day kids and 9 to 3 for full day kids. At most of her camps she breaks up the day with lots and lots of different activities and downtime and many other projects. But the beauty of doll house Camp is that kids are pretty much engaged all day, and that is by kid choice. She always offers a materials buffet for extra rugs, new furniture, mini food, other people, that kids can access throughout the day. If kids needed a break, she always has games, a quiet area with books, and sketchbooks with markers or other simple drawing tools. Hope this helps! xo Bar
Hi, I own Doodle Art & Design in Western Springs, IL and also write a weekly opinion piece for thelatest.com. This week I am writing about the cool phenomena of dollhouse camps that are going on across the country in art studios using the IKEA Flisat dollhouse/shelf. I have a camp going on right now. If you could tell me what inspired you to offer your camp, I would mention you and your studio with a link in my piece! Thanks!