Are you familiar with the phrase Creative Invitation? It’s when you set out some interesting materials on a table which are so enticing, they beckon or invite children to come over and make a creation. Typically, this is a simple set-up with no set instructions and is child-led and open-ended, where there is no right or wrong way to make something. Creative invitations stretch children’s imaginations and allow them to explore materials without the pressure of creating a “craft”, or something pre-determined.
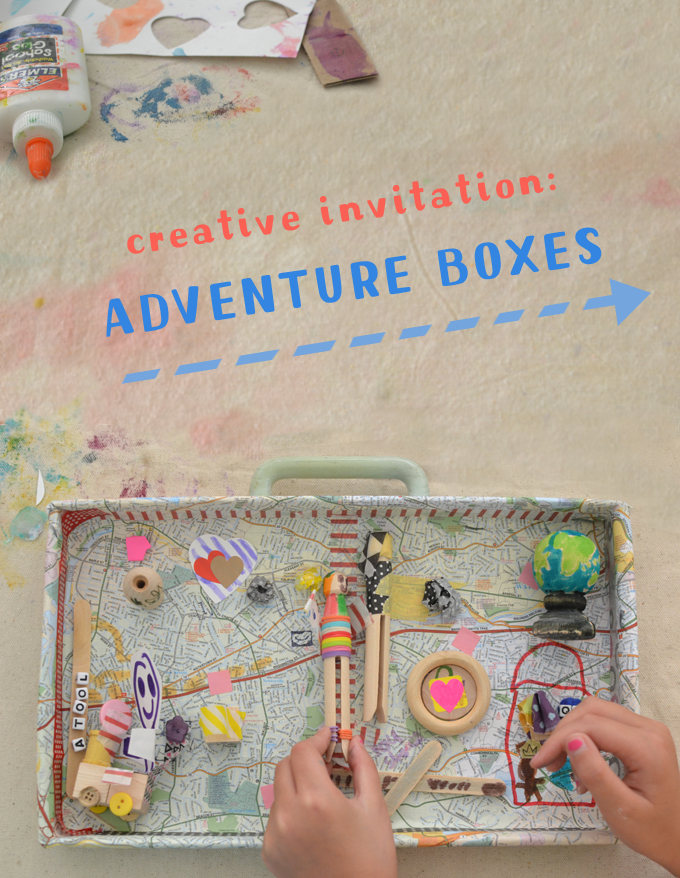
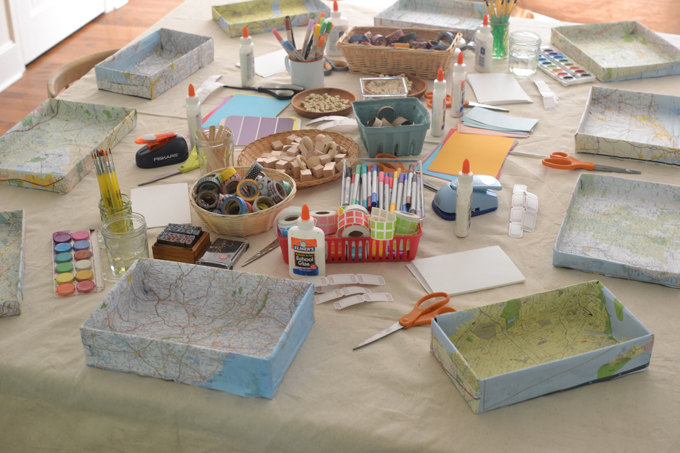
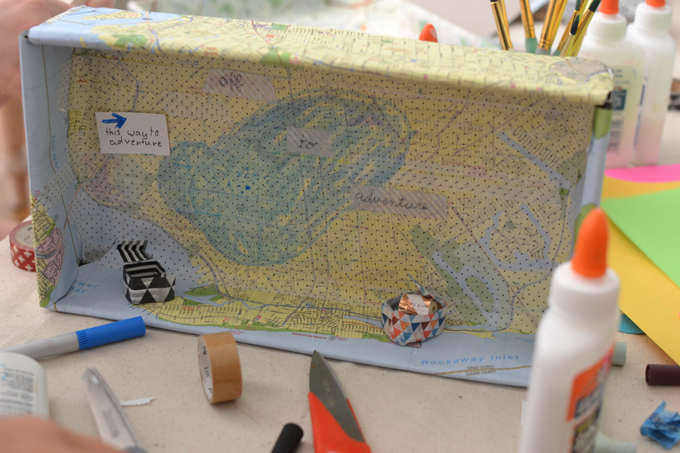
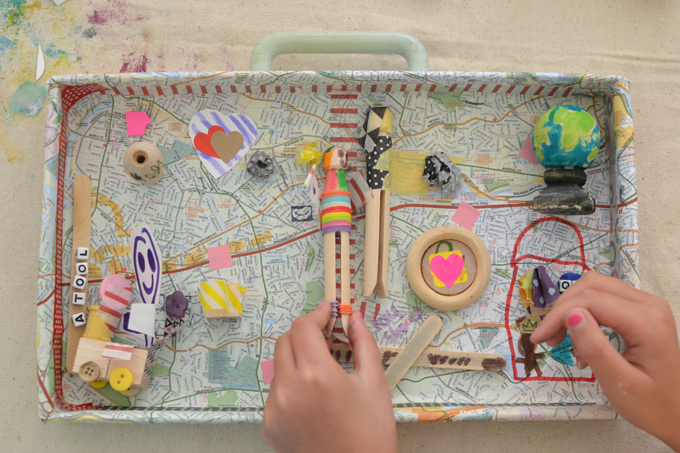
These adventure boxes are a bit more of an elaborate creative invitation in that there is some prep involved in making the boxes prior to the kids arriving. Usually, a creative invitation can be set up very quickly without much prep, which is what makes them so valuable in a home or classroom. But I really wanted to use these maps that I had ordered from AAA, and I also had an abundance of shoebox lids (having used the shoeboxes for a different creative invitation), so I did the work of covering the lids beforehand. After that is was just about setting out a whole bunch of materials that would spark their imaginations!
[ I am a participant in the Amazon Services LLC Associates Program, an affiliate advertising program designed to provide a means for us to earn small fees at no cost to you by linking to Amazon.com and affiliated sites. ]
Supplies needed for Adventure Boxes:
~ Shoebox lids
~ Maps (you can order them for free from AAA)
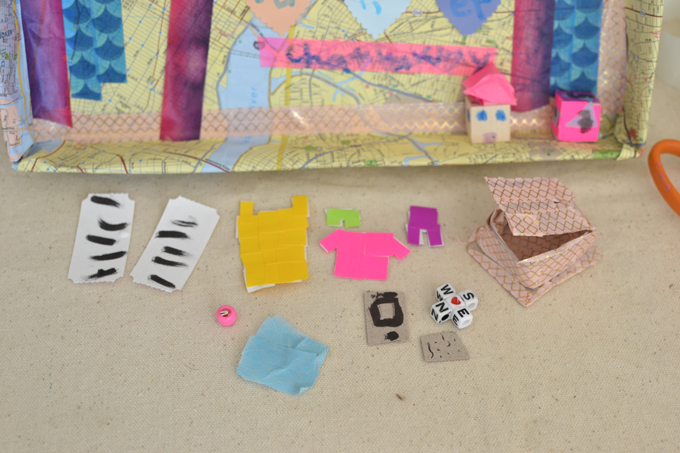
~ Adhesives: white glue, scotch tape, masking tape, washi tapes, glue sticks, hot glue gun
~ Drawing and painting: markers, watercolors, colored pencils, sharpies
~ Paper and stickers: colored paper, paper punches (my favorite are Fiskars), scissors, paint chips, sticker labels, cardstock
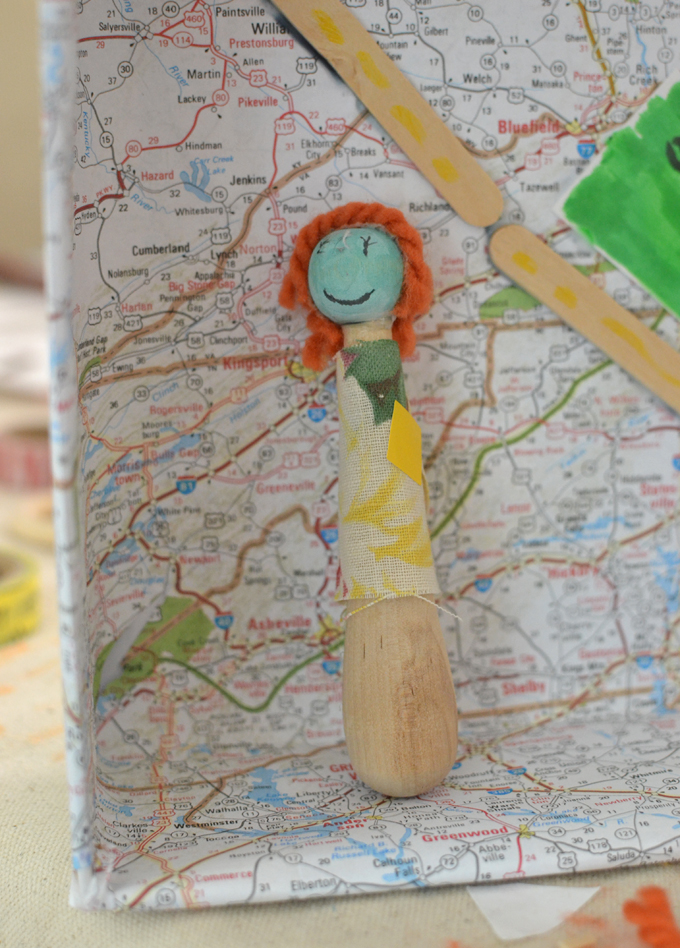
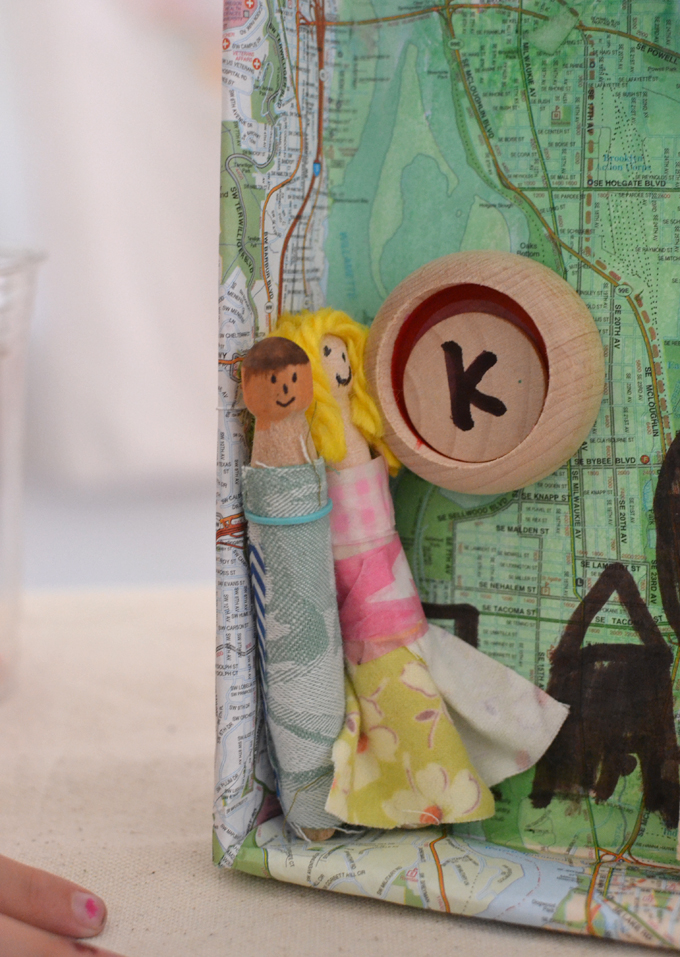
~ Misc: rubber stamps, letter beads, pony beads, buttons, craft wire, wooden beads, wooden clothespins and doll pins, carnival tickets, fabric scraps, rubber bands
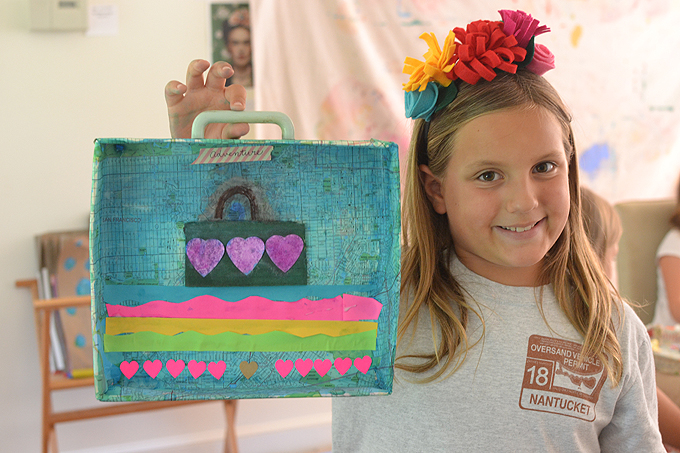
~ Handles are optional (mine are from the kitchen cabinets that we replaced when we moved into our new house. I kept them for two years and was so excited to use them for this project!)
How to set up this Creative Invitation:
1. Cover the lids with the maps. This was not easy, or fun. Just want to be honest! I actually love wrapping gifts and thought I would be really good at this, but in order for the paper to lie flat on the sides of the lid, I needed to make some cuts (like a mitered corner) and since I was in a mad rush – like the kids are coming in half an hour! – I didn’t have the patience. So I suggest doing this the night before! And maybe not being so worried about it lying flat. I’m sure you can do it!
2. Set out all of the supplies either in the middle of the table (if you have a big table) or on another table nearby.
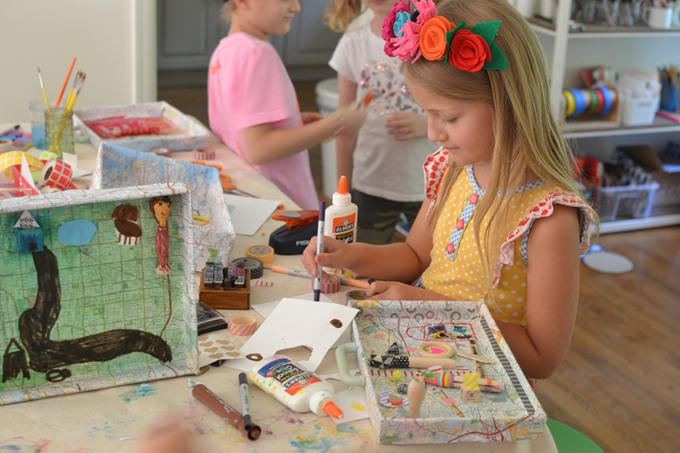
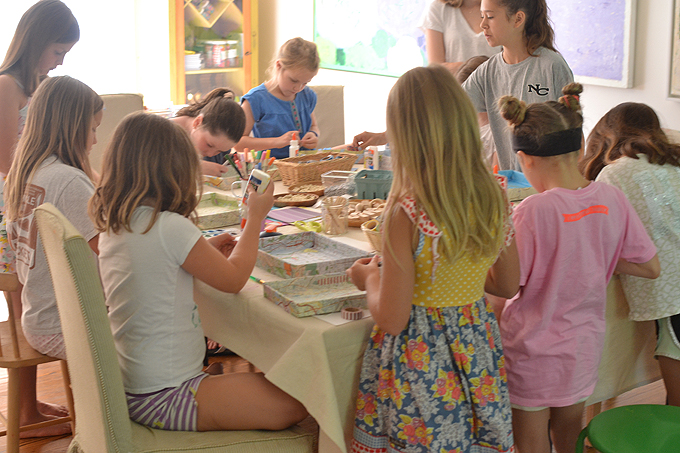
3. When children arrive, let them walk around and take it all in. I try and not give any instructions at first and see what happens. All children are different, some just get started while others need to be told what is happening and what their parameters are. For those kids, I told them that we were making adventure boxes and that they could make anything they wanted. I then described each material on the table. If children were still stuck, I would talk to them for a little while about trips they went on with their family hoping this would spark an idea.
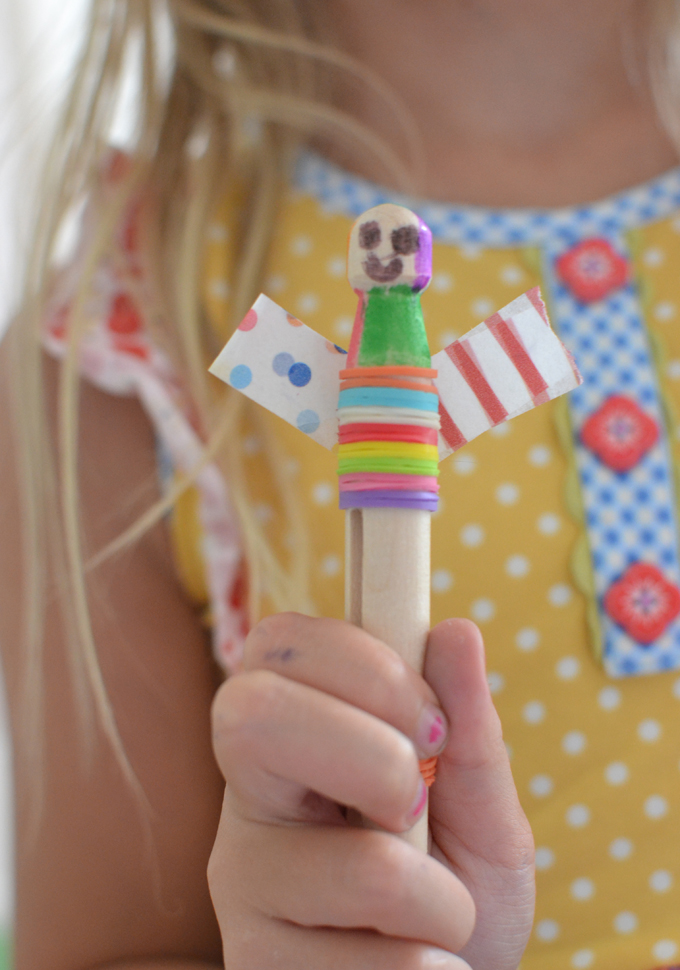
Each child has a different idea. Some ideas are planned ahead and very stylized, while other ideas evolve as they get going. Some kids work very messily, while others are more careful. I love that there are so many different ways of working and so many different visions. It’s one of the beautiful things about creative invitations, there are no limits to your imagination and sometimes your neighbor’s way of doing something can inspire you to try something new.

Interestingly, but not surprisingly, younger children have a much easier time getting started and thinking of ideas. By younger, I mean four and five-year-olds. In my experience, I find that once children hit public schools, they begin to discover that there is a right and wrong way to do something. They are learning to read and do math, both of which are not open to creativity or interpretation. This definitely seeps into their confidence in the art room. They start to restrict their imaginations a bit, and slowly they become self-conscious and wonder if what they are doing is right. This is why I usually do my big creative invitations on the last day of art camp, when they have made new friends and spent four days understanding the new rules (or no rules) of our space. They know they can pretty much use any material to make anything that they desire, and so when the last day comes and I present them with something so completely open-ended, they’ve had a little practice getting back into the mindset of their younger, unrestricted selves. And they feel that they are in a save space among friends.
Plus, the older ones really do learn from the younger ones, maybe even more than the other way around. When your much younger neighbor is feverishly creating things out of paper and wood and buttons, you start to loosen up and realize that your ideas don’t have to be perfect. It’s another reason why I love multi-age classrooms.
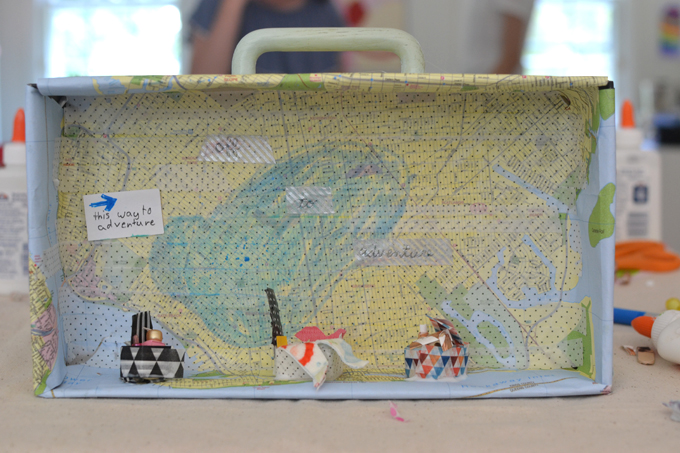
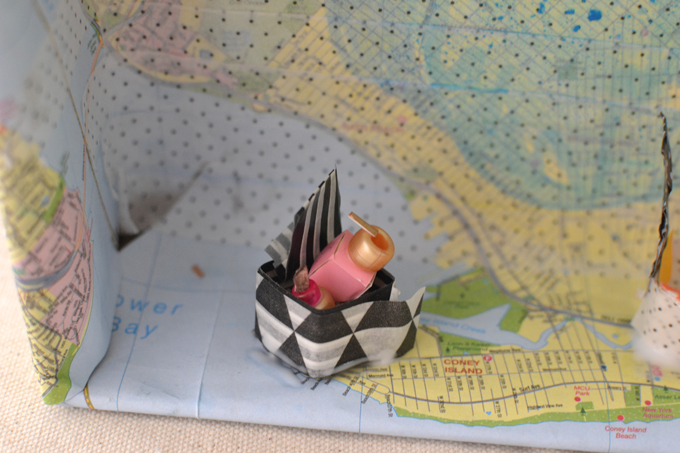
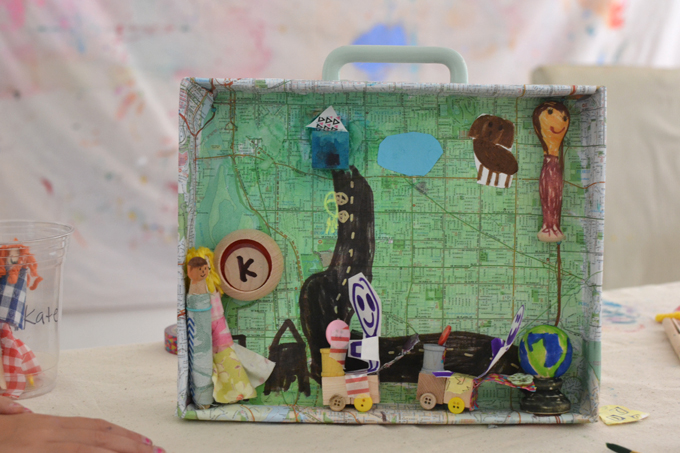
In the end, many kids made their adventure boxes into play kits that they could use to tell stories. I thought this was such a brilliant interpretation of the invitation.
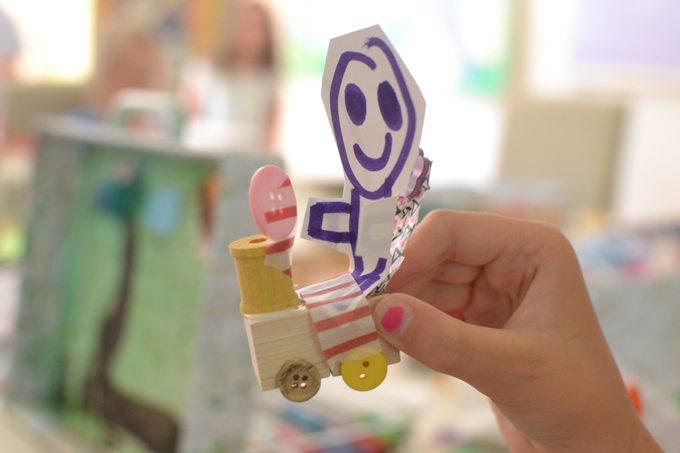

I think my favorite part is the handles, which turns them into imagination suitcases!
Share your photos with me on Instagram if you try this!
xo, Bar
– – – – – – – – – – – – – – – – – – – –


This is such an inspiring piece to read and digest, thank you. Together with a friend (we are both primary school teachers) we run art clubs after school and the children just love having freedom to create their own designs with little input and where nothing is ‘wrong’. I love your idea of adding a handle- how did you do this? Can’t wait to try this out and we will send photos!
You arts club sounds so wonderful!! the handles are actually re-purposed kitchen cabinet handles, but you could probably make your own out off cardboard 🙂 xx Bar
Love this idea. I’m a teacher and we are doing Peter Pan for our school play but younger kids always have to do artwork for decor around auditorium and I’m going to use this for Kindera. Adventure awaits- perfect tool to never grow up! Thank you!!
Loved the Adventure Box!
I am sure the kids will love it!
Going to find some maps. 😀
Thank you for all your fun ideas.
Hi There,
Here is a hint for you. I paint the inside of the boxes first and then cut the paper or felt or whatever just the right size to fit and glue into the bottom. Same goes for the ourside – paint the sides and put paper cou to the same size on the back.
ooh, great tipw. thank you!! sounds much easier 😉 xx Bar
Love your ideas! Sooo fun! I have a random question though.
How do you store your random assortment of art supplies. I have lots of random stuff for projects like this and struggle to easily organize them for storage.
hi Jennifer, I have lots of different ways of storing. I store bigger recyclables in bins, like fabric laundry baskets, and the overflow in my basement go in boxes. The medium-sized things go in smaller clear containers. And the smallest objects go in smaller containers, bowls, or glass jars. I have a lot of these organizational ideas in my book, Cardboard Creations. And I do have a blog post on setting up your art space at home with some photos of how I store things on shelves. Hope this helps! xx Bar
These little world ideas are fantastic! I came to this page to learn about your homeschooling ideas and have been delighted by your whole page! Thank you!!
This was such a unique and creative idea. I did it with my 3.5 year old and she was engaged for an hour and loved it. Usually a lot of crafts last just a few minutes but I loved that you could do so much with this. We made houses and people.
Me encanto la idea de las CAJAS DE AVENTURAS estoy por realizar un curso online de arte y esta actividad me parece genial, como bien lo dices para el final, En este caso cada niño contará con el material que tenga en casa. Esperemos y salgan muy buenas ideas de esto.