• Skip to primary navigation
  • Skip to main content
  • Skip to primary sidebar
  • Skip to footer

ARTBAR

raising creative thinkers

  • MY BOOKS
    • Art Workshop for Children
    • Cardboard Creations
  • ART SUPPLIES
  • SHOP
    • Art Bar on Etsy
    • Art Class Poster
  • ABOUT
  • Nav Social Menu

    • Facebook
    • Instagram
    • Pinterest

DIY Bird Nests

March 27, 2014 by Barbara Rucci 19 Comments

4562 shares
  • Facebook35

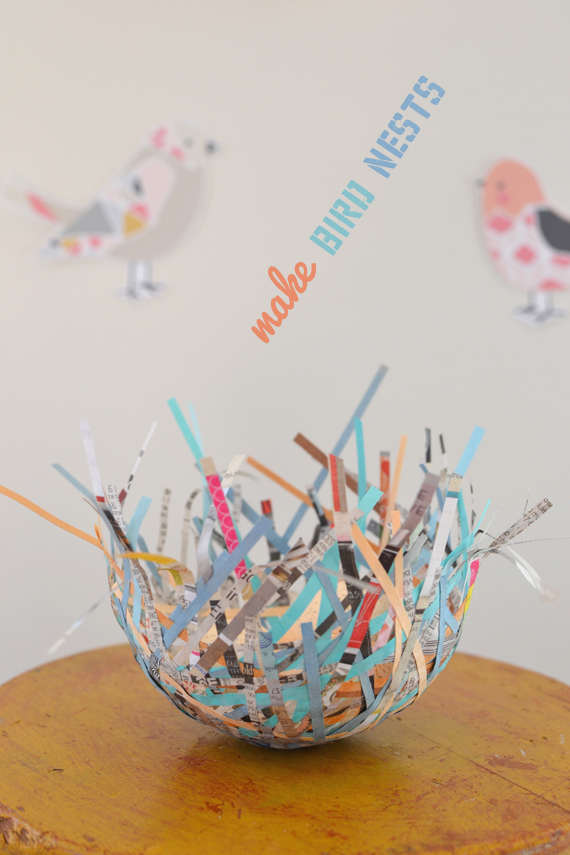
This week I wanted to continue with our theme of birds and share with you this totally cool DIY bird nest craft. OMG, they were so fun!! The best part being the last step which is so satisfying and beautiful that we all gasped (I wish I knew how to type a gasp…anyone?).

beautiful DIY bird nests made from paper, for kids young and old

There are bird nest tutorials all over the internet. I researched a ton about whether to use paper maché or glue, whether I wanted a full nest or a more delicate nest, and lastly….the nest materials. It was hard to make all of these decisions! After a rough start, we finally got the hang of it.

make bird nests from recycled paper | art bar

[ I am a participant in the Amazon Services LLC Associates Program, an affiliate advertising program designed to provide a means for us to earn small fees at no cost to you by linking to Amazon.com and affiliated sites. ]

Materials for DIY Bird Nests:

~ chopped paper (construction paper, newspaper, catalogs, magazines)

~ paper cutter or scissors (or a shredder would be best!)

~ Elmer’s glue

~ thick paint bush

~ one bowl of the size that you want your bird’s nest to be

~ plastic wrap 

make bird nests from recycled paper | art bar

How to make DIY Bird Nests:

Most of the tutorials online said to soak the paper strips in the glue or paper maché first, then spread them around the bowl. We tried this, but it became a goopy mess and the paper started ripping. So this is the technique we came up with.

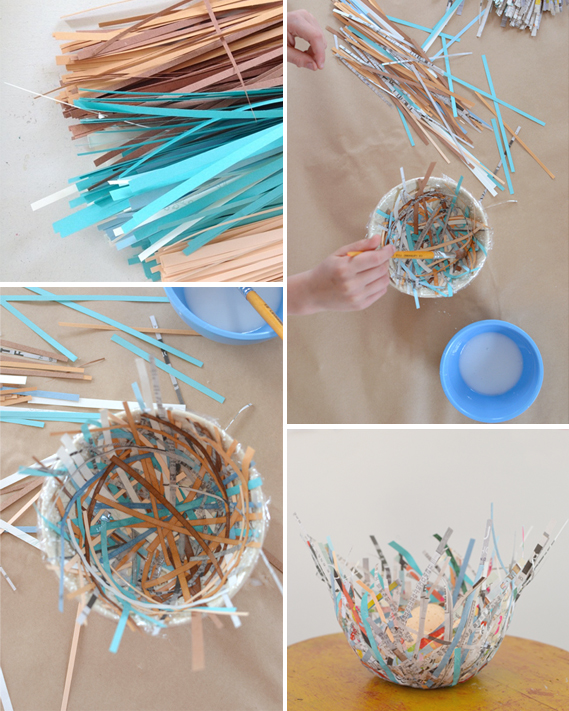
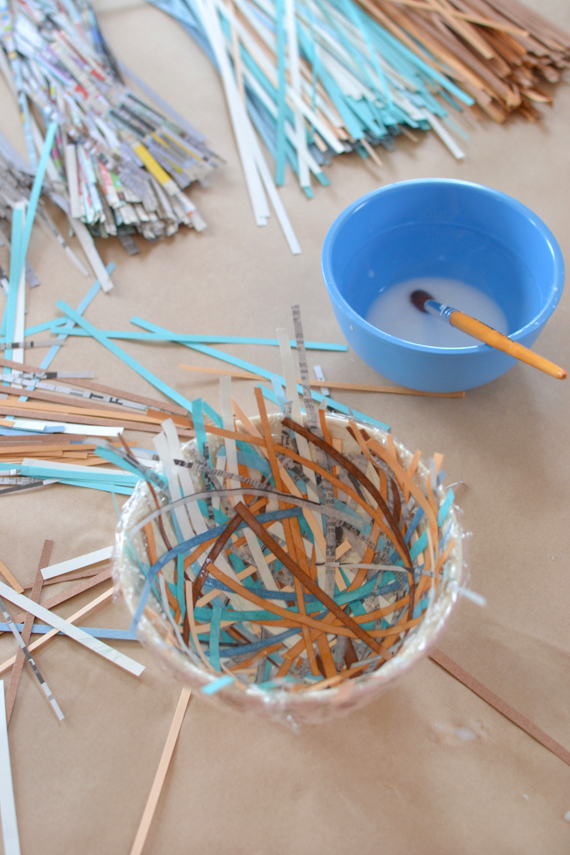
First, we cut our paper into strips about 1/4″ in thickness. The strips varied in length from 6″ to 12″.

Next, we put plastic wrap on the inside of the bowl. We mixed glue with water (half and half), and brushed glue all on the inside of the bowl on top of the plastic wrap. We then took individual strips and arranged them criss-crossing around the bowl.

After a while, we would paint on more glue which helped keep the layers down. We then added more paper strips, until about four layers were formed. Sometimes we would put the strips around, like a real nest. Other times just across so the pieces would stick out. When our fingers got too sticky, we wiped them on a wet paper towel.

We let the bowls dry overnight. Then….drumroll, please….we lifted the nests out of the bowl and pealed off the plastic. Voila! We had the most beautiful and delicate nests!

make bird nests from recycled paper | art bar

Kids make bird nests from shredded paper and glue.

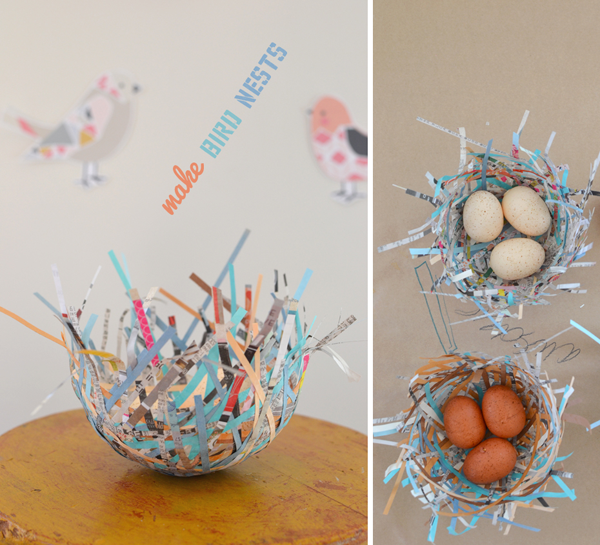
We played around with color, but loved the blues and browns most (with a hint of pink). I used a Paper Source catalog which is made from a really nice matte paper, and their use of color is muted and perfect. (If you don’t know about this catalog click here to get one for free! And definitely visit their online store.) These will be so cute for Easter, or just a gorgeous Spring decoration.

Have a crafty weekend!

xo, Bar

{nests inspired by this post}


Filed Under: Recycled, Open-ended Crafts for Kids, Teen Crafts, DIY Tagged With: bird nests, Easter craft

Previous Post: « DIY Bird Garland
Next Post: A Year of Making »

Reader Interactions

Comments

  1. meri cherry

    March 27, 2014 at 5:42 pm

    umm…AWESOME!!!

    Reply
  2. Kate - The Craft Train

    March 30, 2014 at 9:44 pm

    I love these!

    Reply
    • Barbara Rucci

      March 30, 2014 at 9:56 pm

      thank you kate!! xo bar

      Reply
  3. Natalie

    April 1, 2014 at 10:29 am

    lovely Idea for Spring! The same glue mix works for dry autum leaves bowls. You only have to wait a bit…Best, Natalie

    Reply
    • Barbara Rucci

      April 1, 2014 at 12:21 pm

      ahhhh….good to know!! thank you natalie, i will have to try that with leaves! xo bar

      Reply
  4. Cassi

    April 5, 2014 at 4:19 pm

    Paper nests are a favorite of mine! I’ll be featuring it soon on The Crafty Crow 🙂

    Reply
    • Barbara Rucci

      April 6, 2014 at 2:24 pm

      thank you cassi, love the crafty crow!!! xo bar

      Reply
  5. jody

    April 16, 2014 at 12:50 pm

    wow. i love these so much!!! i am going to feature these on my blog today. my favourite easter craft i have seen in the last couple days! loving your blog!!!

    Reply
    • Barbara Rucci

      April 20, 2014 at 7:26 pm

      thank you jody!! and thanks for featuring! hope you got a chance to make them…they’re pretty awesome 🙂 xo bar

      Reply
  6. Cheryl

    March 13, 2016 at 12:17 pm

    So cute! Where did you find your bowls?

    Reply
    • Barbara Rucci

      March 18, 2016 at 8:00 am

      hi cheryl! i found the bowls in my kitchen 😉 they are just melamine mixing bowls. any small to medium cereal bowl will do!! good luck!! xo bar

      Reply
  7. M.Revathi

    September 15, 2016 at 7:57 am

    Bird nest is very Super! Easy and simple. Its very useful to my child school project work. Thank u very much…

    Reply
  8. Ann Martin

    January 7, 2018 at 5:59 pm

    So cute! I shared your link in my most recent newsletter.

    Reply
    • Barbara Rucci

      January 8, 2018 at 1:04 pm

      thanks so much for sharing my nests in your letter, Ann. I do appreciate it!! XO Bar

      Reply
  9. Cara

    March 20, 2018 at 12:45 am

    We are working on a bird unit this week and these nests are gonna be absolutely PERFECT!! Thanks for yet another fabulous idea, Bar 💕

    Reply
  10. Teresa

    June 6, 2018 at 9:03 am

    I’m gonna make these in my daycare today! The kids are excited! Thank you!

    Reply
  11. Nellie Stubbs

    December 30, 2018 at 8:42 am

    These are lovely. I know this is not exactly spring season, but it will be here before you know it.

    Reply
  12. Martie

    March 25, 2019 at 1:59 pm

    I am excited to make these with my class. Thank you for the great idea! I will be using origami paper because I have a lot of it. I hope that variation works.

    Reply
  13. Cindy Simon

    April 11, 2020 at 8:55 am

    now i know why i’ve been keeping that Paper Source catalog tucked to the side! Thank you!

    Reply

Leave a Reply Cancel reply

Your email address will not be published. Required fields are marked *

Primary Sidebar

The Creativity Project
RESOURCE FOR TEACHERS
Join our course!
Your subscription could not be saved. Please try again.
Your subscription has been successful.

Yes! I want to raise thoughtful and creative children. Send me more inspiration, please!

artbarblog

artbarblog

Happy birthday to my effervescent, compassionate, Happy birthday to my effervescent, compassionate, caring, full of life, funny, kind, generous, sensitive, extroverted, loving, sassy, playful, creative, smart, beautiful, philosophical, dreamy, wise, empathetic middle child, with her giant heart and lovable personality. Send her some words of wisdom, greatest advice, favorite quote, or just best wishes for this 22nd year around the sun!

I love her so 💕
Long overdue, but our last module of our 12-part c Long overdue, but our last module of our 12-part course dropped in the beginning of August and we saved the best for last! Printmaking is for sure my favorite art process, and the best part about saving it until the end is that it uses so many of the materials and elements we have covered this year in the course. Materials Matter is now closed until September but you can sign up for the waitlist in my bio link. We are relaunching it as a bundle that will include reflection questions for each module and 24 hours of PD certificates! If you sign up for the waitlist you will also get an additional discount! 

So much happening @the.creativityproject… this week we launched an inspiring new workshop series that we are super excited about. We developed it for everyone — classroom educators, art studio educators, childcare providers, pre-service educators, parents, and caregivers. The first workshop is called “Set it Out and See What Happens” and it’s FREE! Sign up at the link in my profile, or just comment below that you are interested and I’ll dm you the link. But if you are private, you will have to message me first 😉

I hope you will join @hatchartplay and me as we explore materials, environments, mindsets, and systems, all rooted in our unique approach to creative learning.💛
I’ve been scrolling back through photos to find I’ve been scrolling back through photos to find documentation of my stepmom’s cutting flower garden in Maine. Despite losing my wildflower mojo after getting poison ivy all over my body — thank you everyone your tips, I actually got rid of it after taking prednisone, only for it to come back in all new places the day after I finished treatment 🤔 — I still dream about building a structure like this in my yard for next summer. I love wildflowers, they make me happy! 

Anyway, I came across these sun print photos from the last time we were in Maine and realized I never posted all of them here. It was the first time I used the paint-on Solarfast dye so I can’t say I’m an expert, but it seems pretty forgiving.

We worked in a darker corner of the room so the fabric wouldn’t get too exposed, and then brought the arrangements outside into a very bright sun. You can put a piece of glass or plexiglass over the natural materials to get cleaner lines and prevent the materials from shifting with the wind, but I really love the different blue values that the shadows created.

I didn’t take photos of creating the final embroidery hoop piece, but it’s pretty easy and self-explanatory. I’ve been holding onto it for a while now, waiting to hang it in just the right spot. And now that I am revisiting this experience, I really want to experiment with different colors, although I love indigo blue.

This project comes from @purpletwig, her imagination and originality inspire me endlessly. Thank you @annsxb for indulging my creative exploration! 🌸
This is what procrastination looks like for me tod This is what procrastination looks like for me today. I grew some wildflowers for the first time, I don’t know why it took me this many years. I made my first bouquet last night! This morning I was wondering how many ways I can photograph these flowers that I made (basically). Different angles, different lighting. What would look bad with flowers, anything? Do flowers make everything look better? What is the opposite of flowers, smelly shoes? A toilet? The garage? I am looking for contrasts, but not too contrived. How is this art? Is this art? Will Maple sit next to them? No, she’s scared. I’m so proud of my flowers! Art makes you feel, so this is art. Should I share? Which is the best photo, which is the worst? I kind of like taking bad photos, thanks Gen Z ☺️

1. My first photo, I like this one because it’s spontaneous and my house looks clean. 
2. The bouquet in its natural environment, next to the little wildflower patch. The lighting is a little too contrasty for me. 
3. In my new bathroom, I take lots of bouquet shots in here. 
4. Contrast of wildflowers and square photos. Not my fave. 
5. Figgy being a good girl and posing next to flowers for me. 
6. Brought them to my least favorite room, my bad 80s bathroom. I like the contrasts here and the split mirror. 
7. Flowers don’t make the garage nicer. Now I’m feeling like this experiment is over. 
8. @grace.rucci took this photo last night when I made my happy bouquet 💐

Ok, back to work.
Load More Follow on Instagram

Categories

Archives

Copyright and Reposting

All content on this blog is copyright and owned by Art Bar Blog unless otherise stated. I would be flattered if you wanted to use an image from one of my posts! But please, ask me first. I would also ask that if it involves DIY instructions with a list of supplies that you don't repost any of that stuff because then nobody would have a reason to click back to my original post!

Footer

  • Facebook
  • Instagram
  • Pinterest
  • Twitter
  • YouTube

About Me

There are two things that I'm passionate about: Children + Art. As an art teacher, author, graphic designer, and mom to 3 creative thinkers, I get to explore my passions every day! Learn more...

I am dedicated to keeping your information safe. Please review my Privacy Policy.

Recent Posts

Harris Walz handmade prints in a stack next to a printing plate
Mushroom print on a table made with styrofoam sheets and printing ink.
Children make sculptures with wood, glue, magazines, and other collage materials and dry them on a rack.

Copyright © 2024 · Foodie Pro & The Genesis Framework