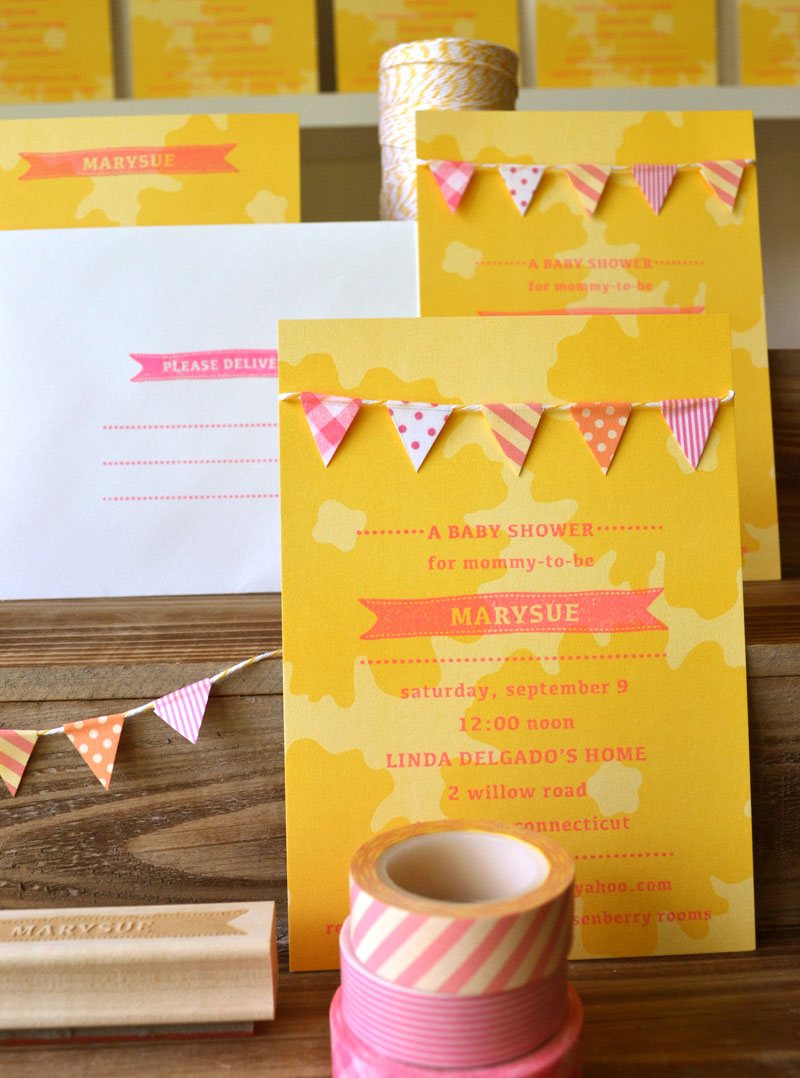
This week I’d been given the distinct honor of creating a baby shower invitation for my SIL, the esteemed Marysue Rucci of Simon & Schuster. Lucky me! After hours of late night thinking and scouring, I finally decided on a theme: Shabby Chic. I have had an obsession lately with rubber stamping, flag bunting, and washi tape. Combining these elements was soooo much fun. I knew the mommy-to-be would be decorating her baby girl’s room in yellows with a touch of pink, so the color choices had been made. Planning and execution were my biggest hurdles.
Here’s how it went down (I’ve included the bunting template for you)…

The type on this invitation was created entirely with custom made rubber stamps. The invitation copy was one rubber stamp. The envelope front and back were each a rubber stamp. And I even made a rubber stamp of just my SIL’s name so that I could create thank-you notes for her as a gift.
I designed the yellow flower cards and sent them out to be printed. I then used pink ink and stamped each card individually. It was quite a bit of work, I wouldn’t recommend this to anyone. But I really wanted an authentic hand stamped look, and I’m a little bit crazy, so there you go!

To create the flags, I did some measuring. The card was 4.5″ wide, and the washi tape was 5/8″ wide, so I calculated fitting five flags across. I created a row of triangles, each triangle measuring the width of the tape. I used a faint line so that you wouldn’t see it if my cutting wasn’t up to snuff (hopefully you can see it in these photos!).
Next, I cut out the strips and laid them beneath the pre-cut pieces of string. (This photo above shows one, but I actually did several at a time).

Then I very carefully placed the tape over the paper, making sure that it fit perfectly over the triangle, and going over the top of the string. After I taped all five triangles, I pulled up the string from the table and flipped the tape over to the back.
IMPORTANT: When flipping the tape over the back, make sure that the string is secured just above the paper, not pushed over to the back. This will be crucial when cutting.

Time to cut the flags! This was really fun. I just followed the lines of the triangles underneath the tape. I clipped as close to the top edge as I could without cutting the string.

Next, I got out my exacto knife and a ruler. I made two teeny nicks on the edges of the card, using the ruler as a guide and a straight edge. This allowed me to slip in the string and hold it in place. I then tied the back, trimmed the string, and I was done!


Creating invitations by hand is one of my favorite things to do! Especially when it’s for someone I love so dearly.
xo, Bar
Bar, I love your new site design & your recent posts have been great. I was excitedly surprised to see this post about Marysue…. I had a fun visit with her in Jackson Hole in summer 2010, but I’m obviously a little out of touch as this was news to me! Thanks for sharing the lovely invites (I’m also obsessed with washi tape) and the news. I’ll call/write her tomorrow!!! Cheers, Libby
Libby…wow, what a small world! I’m sure she would love to hear from you 🙂 She’s doing great. Thank you for visiting my blog! xo Bar
invites are beautiful. and congrats to marysue!
These are ADORABLE! Love how you made the bunting!
This invitation card looks wonderful. I love the designs and every detail of it, really awesome. You’ve done a great job. Thumbs up!!
Thank you for sharing 🙂
Cheers !!
Maureen
Where did you have those amazing rubber stamps made?
hi christine! i had them made at rubberstamps.net. hope this helps! xo bar
woowww amazing hand made thing are so lovely keep it up dear thanks for sharing
I love it! The link is not working for the template-is it still available?
hi Karen, I fixed the flag-bunting link so it works now! thanks for letting me know! xo Bar
So cute and clever! Exactly what I’ve been looking for to make my own diy baby shower invites! What size rubber stamp did you order to fit the invitation so well?