• Skip to primary navigation
  • Skip to main content
  • Skip to primary sidebar
  • Skip to footer

ARTBAR

raising creative thinkers

  • MY BOOKS
    • Art Workshop for Children
    • Cardboard Creations
  • ART SUPPLIES
  • SHOP
    • Art Bar on Etsy
    • Art Class Poster
  • ABOUT
  • Nav Social Menu

    • Facebook
    • Instagram
    • Pinterest

DIY Cardboard Easel

May 24, 2015 by Barbara Rucci 44 Comments

25120 shares
  • Facebook243

quick and easy way to make your own table easel with cardboard

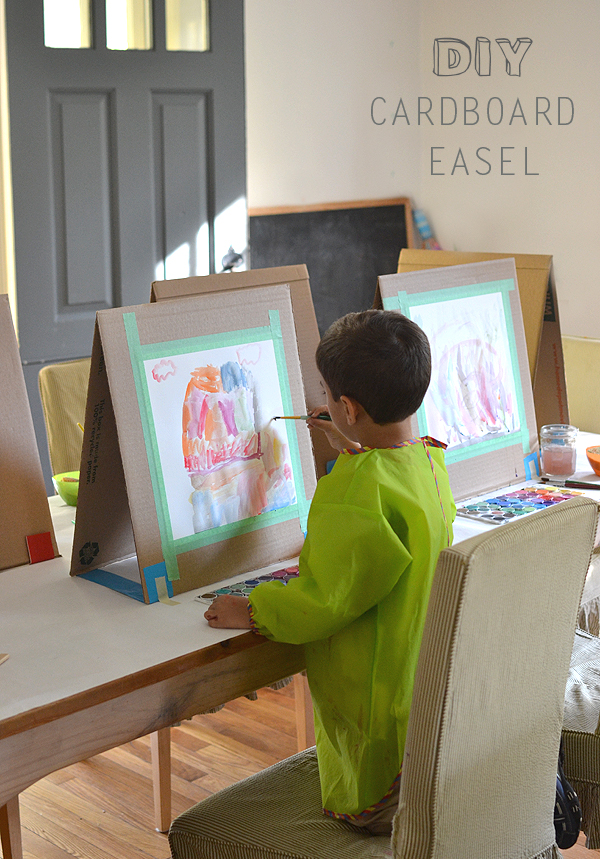
There are many ways to make a quick easel. I might have learned quite a few tricks if I had actually researched before I made this project. But I’m much more of a spontaneous planner, and I woke up on the morning of art class with an idea that my students should experience painting on a proper easel. I quickly went to the attic, where we still have mounds of brown boxes from our move last year, and I grabbed a few and brought them downstairs. The following is my solution to the DIY easel!

quick and easy way to make your own table easel with cardboard

This post contains affiliate links. Thank you for your support!

Supplies:

~ Large cardboard boxes (mine were 18″ x 18″ x 16″)

~ Duct tape

~ Sticky back velcro

quick and easy way to make your own table easel with cardboard

How to:

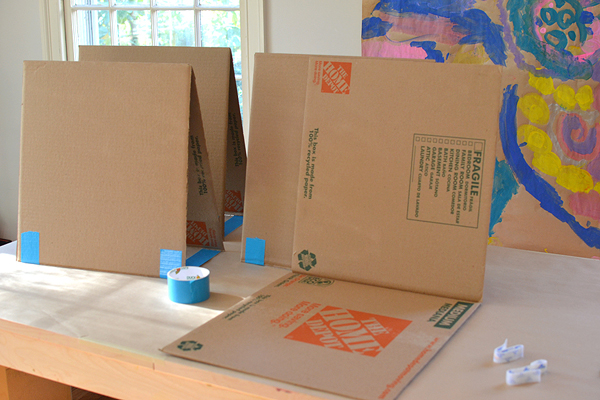
1. Start by cutting down your box. Cut off the top and bottom flaps of your box (save for possible painting project in the future). Now cut down two of the four sides. You should now have two hinged pieces.

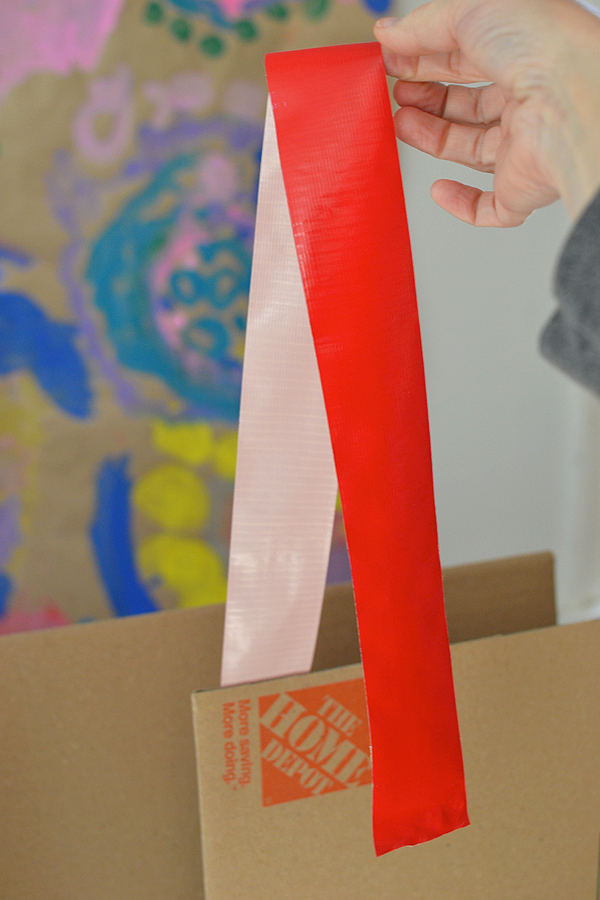
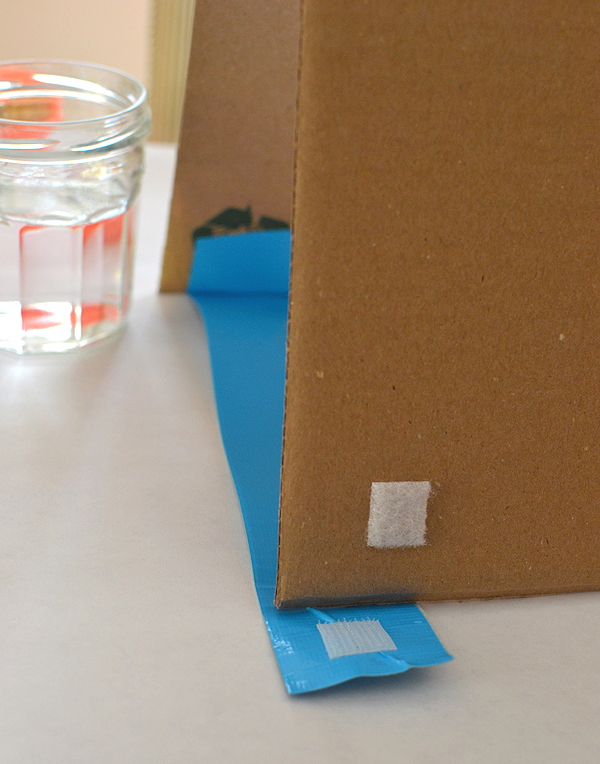
2. Cut a long piece of duct tape (about 26″). Tape the end to the bottom of the cardboard, then fold the tape over in half, taping it back on the other side of the cardboard.

quick and easy way to make your own table easel with cardboard

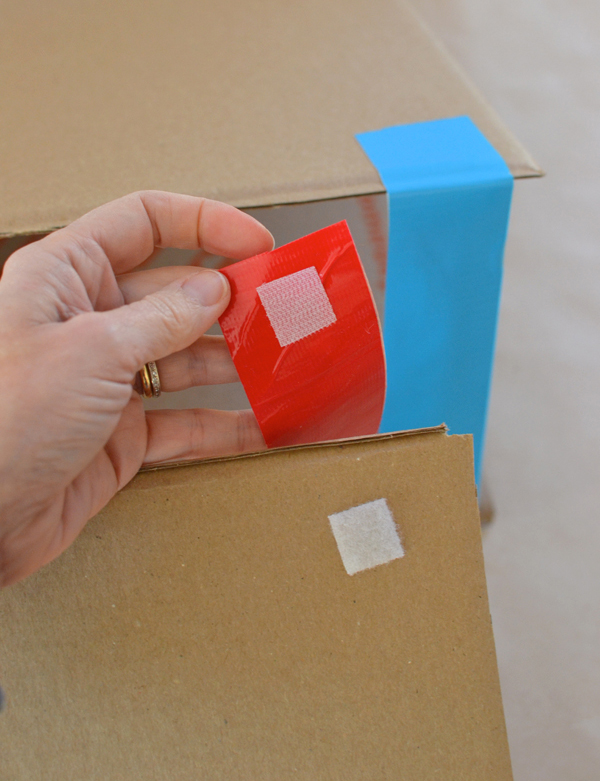
3. Cut a piece of sticky velcro and attach one to the duct tape and one to the cardboard. Done!

quick and easy way to make your own table easel with cardboard

quick and easy way to make your own table easel with cardboard

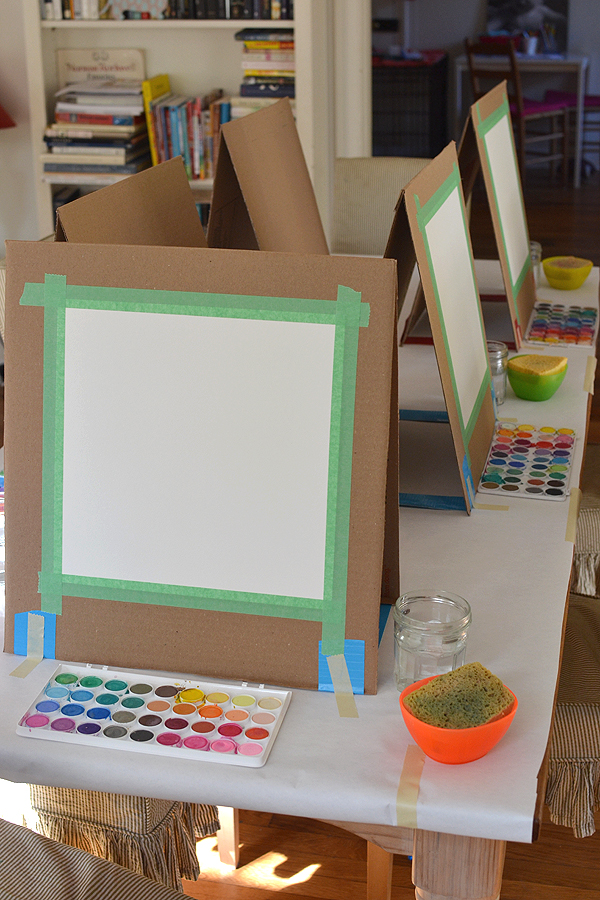
I did add a piece of masking tape to stick the easels to the table as they are so light-weight that I didn’t want them moving while the kids painted. You could also just prop something up to the back.

quick and easy way to make your own table easel with cardboard

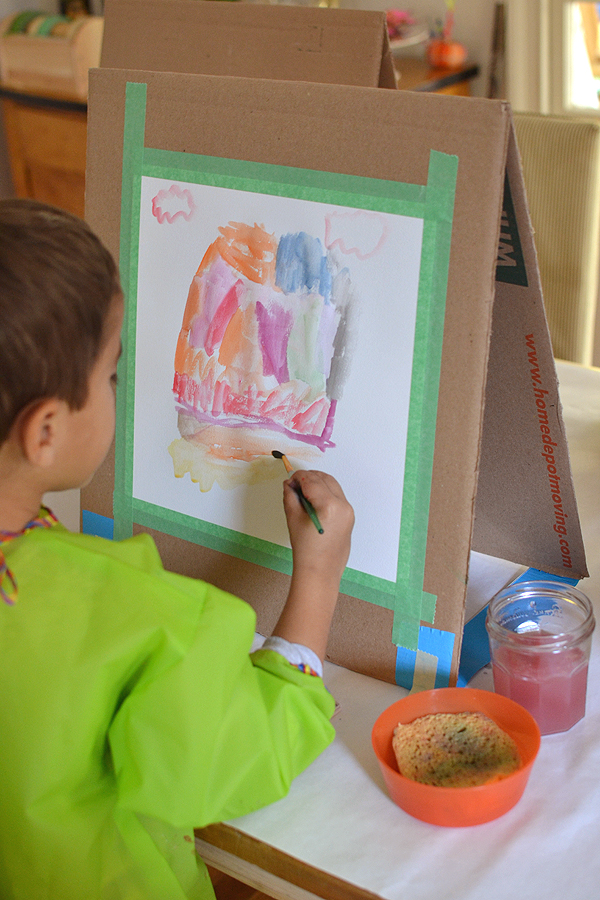
On this day I taped a piece of paper to their easels, but you could also add some bulldog clips to the top or sides and then it would be easy to add/remove paper in a jiffy.

quick and easy way to make your own table easel with cardboard

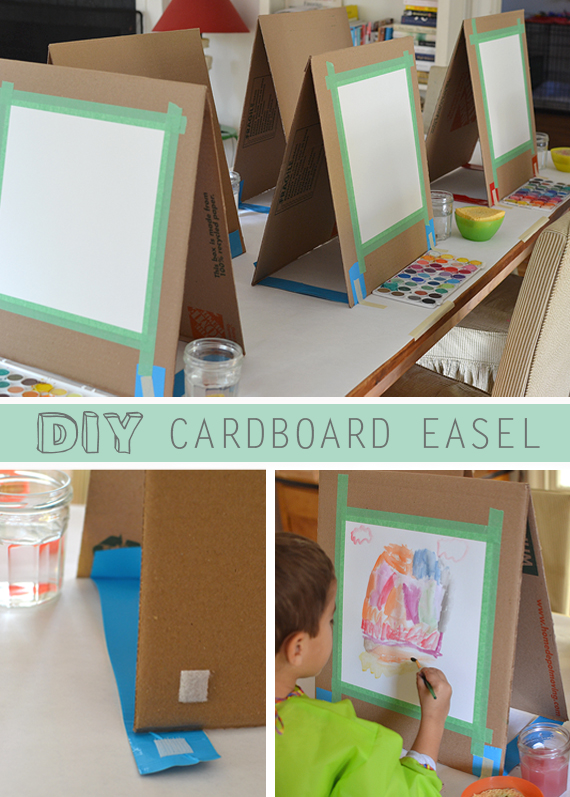
The best part about these easels are that they are so easy to fold up and store! Let me know if you try to make these and if you think of any clever, new tricks.

xo, Bar


Filed Under: Recycled, DIY Tagged With: cardboard easel

Previous Post: « Collaborative Painting with Kids
Next Post: Melted Crayon Butterflies »

Reader Interactions

Comments

  1. Jess @ Let's Do Something Crafty

    May 25, 2015 at 2:25 am

    These are great, I love anything that uses up cardboard. Will definitely be giving these a go 🙂

    Reply
  2. Grace

    May 28, 2015 at 4:50 pm

    Wow! I didn’t even read the whole thing about the cardboard easel yet, but the second I even saw the title, I was thinking about what an amazing and creative person you must be! I can’t wait to finish reading!

    Reply
    • Barbara Rucci

      May 29, 2015 at 6:09 am

      thank you grace, you are too kind. i hope you try to make these, they are super easy. thanks for leaving a comment! xo bar

      Reply
  3. Rachelle | TinkerLab

    June 1, 2015 at 8:13 pm

    These are great, Bar. I love that they fold away compactly when you’re done with them. LOVE!

    Reply
    • Barbara Rucci

      June 1, 2015 at 10:42 pm

      thank you Rachelle! i love seeing your comment…made my day 🙂 xoxo

      Reply
  4. Kelly

    June 7, 2015 at 12:40 pm

    Thank you SO much! This past week, my kids and I were talking about wanting to do some painting at home this summer, but the fact that we lacked easels. This is the absolute perfect solution! I have an attic full of boxes begging to be repurposed:). I can’t wait to get started on our next art adventure!! Happy Creating ~

    Reply
    • Barbara Rucci

      June 7, 2015 at 7:51 pm

      oh i’m so glad you found this post, kelly! thanks for leaving a comment and i hope you are able to make these and use them all summer. let me know how it goes! xo bar

      Reply
  5. Morgana

    June 20, 2015 at 12:09 am

    Great idea. Just came home from hispital we lost for the second time our baby. And don t want my four years hold child to see a depress-sad mom tomorrow I will have his friend over so they can get art crazy in the patio with this proj. Thanks for the idea
    Ciao

    Reply
    • Barbara Rucci

      June 20, 2015 at 9:01 pm

      i’m so very sorry for your loss, morgana 🙁 xo bar

      Reply
  6. Jen @ Saving with Jen

    August 23, 2015 at 9:33 pm

    I love the watercolor trays! Where did you find them?

    Reply
    • Barbara Rucci

      August 26, 2015 at 8:52 am

      hi jen! they are Loew Cornell watercolors from Amazon. we use them all the time. xo bar

      Reply
  7. Cheryl

    September 14, 2015 at 2:20 pm

    Was looking for something else – but isn’t it wonderful how we stumble across things? I did something similar to display educational information about snakes for my demonstrations – but your ideas gave me ways to improve on what I did (I didn’t use the tape to hold the pieces) But thinking you could use colorful tacks to hold the paper – that way i doesn’t matter the size of the paper….but not sure if that iwould be wise with young children

    Reply
    • Barbara Rucci

      September 16, 2015 at 7:56 am

      hi cheryl! thanks for stopping by and leaving a comment, so glad you found me! yes, tacks would be another great idea. and another reader suggested clothespins or binder clips. there are many ways to make this work! thanks for your suggestion! xo bar

      Reply
  8. kelli

    February 29, 2016 at 12:41 pm

    I covered both sides with clear contact paper to make them easy to sponge off.

    Reply
    • Barbara Rucci

      March 3, 2016 at 7:44 am

      brilliant Kelli!!!!

      Reply
  9. Ana

    April 20, 2016 at 11:06 am

    Maravilloso y gracias por compartirlo podré disfrutar con mis hijos..mi más sinceras felicitaciones

    Reply
  10. Dale

    August 18, 2016 at 1:09 am

    Great idea! I’m doing a painting party for my daughter’s 13th birthday. They are painting acrylic painting, setting up a whole “class” in the garage. This is perfect as I’m looking for something cheap because I have to have about 10 – 15 of them. Thanks!

    Reply
    • Barbara Rucci

      August 19, 2016 at 4:18 pm

      oh wow, these would be perfect for your party! i hope you have a bunch of boxes saved. of maybe a store in town has some they want to get rid of. I love that the easels can fold up flat, too. good luck with the party Dale! xo Bar

      Reply
  11. lori

    August 19, 2016 at 7:23 am

    this is brilliant!!! Totally making these for my students!

    Reply
    • andree jeanne

      November 22, 2016 at 10:47 am

      I am French Were buy DIY Cardboard Easel for present to Noel ?and the price,for Rémi my little boy
      Thank you for answer
      Andree Jeanne

      Reply
  12. Kerry

    November 10, 2016 at 5:11 pm

    I’m a 2’s teacher, and I used pizza boxes, works perfect!!????

    Reply
    • Barbara Rucci

      November 22, 2016 at 11:08 am

      great idea Kerry!

      Reply
  13. Rachel

    November 16, 2016 at 12:59 pm

    Hi! Any suggestions on how to alter this to hold an actual canvas? Looking to do a paint night for a lot of ladies and want a cheap or very low cost table top easel option…

    Reply
    • Barbara Rucci

      November 22, 2016 at 11:10 am

      Hmmm… you could use these, but you would have to put a weight behind them so they don’t slide back. then you could lean the canvas up against the cardboard. try with one and see how it goes!

      Reply
  14. Joyce

    December 12, 2016 at 11:54 am

    Thanks so much for this idea. I’m also planning a ladies paint and sip party. I plan to cut and glue the extra pieces of cardboard together to make a thick bar that I can hot glue or duct tape near the bottom of the easel to make a ledge for the canvas.

    Reply
  15. Alyssa

    May 11, 2017 at 2:47 pm

    Great idea. I wanted to let you know that I am featuring this in an art party roundup if you don’t mind.

    Reply
    • Barbara Rucci

      May 23, 2017 at 10:50 am

      great! thanks so much Alyssa! xo Bar

      Reply
  16. Beverly

    July 19, 2017 at 8:23 pm

    Thank you for sharing this project. With summer here, I need special things like this for my grandchildren. I just completed one for my granddaughter who is 4 and now I’m working on one for my 2 year old grandson. So, So easy and fun to do. I further decorated the easel with colorful duck tape, which my granddaughter choose and helped me apply. Thank you again.

    Reply
  17. Tonya M.

    July 22, 2017 at 6:36 am

    This post may not be recent, but it’s definitely still relevant! I’m disabled and finding a work-around for the supplies I desire but can’t afford is a real blessing! Thank you!

    Reply
  18. Jackie Zapien

    August 17, 2017 at 10:40 pm

    I love this. I am thinking that I can turn this into a felt board easel as well. Definitely going to give it a try!!!!

    Reply
    • Barbara Rucci

      August 18, 2017 at 7:45 am

      ooh, I love that idea Jackie!

      Reply
  19. Karl Anderson

    September 2, 2017 at 1:42 am

    Clever idea, thanks! I want to transform my student’s large sketchbooks into an A frame easel like the ones you’ve made for doing self portraits by opening them up and turning the sketchbook on its side. The tape and Velcro just might work…

    Sketchbook plus a decent size mirror taped onto one side of the page will be heavier I’m guessing. We’ll see. Thanks again!

    Reply
    • Barbara Rucci

      September 5, 2017 at 10:29 am

      let me know if it worked, Karl!

      Reply
  20. Emily

    May 8, 2018 at 11:16 am

    This would be a great project to do with my Pre Schoolers thanks for the idea 👏🏻

    Reply
  21. Ruth Anne

    July 22, 2018 at 2:53 pm

    What a super idea. There is always a lineup at the easel. Now we can have more children using various mediums – paint crayons markers etc. And I am a huge fan of recycling.!!

    Reply
  22. Jamecia R Willis

    December 11, 2018 at 2:28 pm

    How many easels can be made from one box? Two?

    Reply
    • Barbara Rucci

      December 28, 2018 at 5:34 pm

      hi Jamecia, yes.. two!

      Reply
  23. Maggs

    April 7, 2019 at 8:34 am

    I am late to the party,but this is still a great idea! My 5 yr old has finally slowed down enough (he didn’t walk, he ran you get the idea) that he is now interested in drawing, and maybe painting. This cardboard easel will be great, and easy to put away!

    Reply
  24. Oluwaseun Ayanyemi

    April 23, 2020 at 11:30 am

    This is simple and very creative. Thanks for this

    Reply
  25. Lynda Marwood

    October 1, 2020 at 2:49 am

    Can I share this on my Village newsletter please in the Scottish Borders. I have been teaching preschoolers and children, teenagers privately for over twenty years now.

    Thank you so much for sharing this. I have made cardboard easels but without velcro.

    Cheers
    Lynda

    Reply
    • Barbara Rucci

      October 4, 2020 at 2:25 pm

      hi Lynda, of course! Please just make sure to link back to the original post. Thank you!! xx Bar

      Reply
  26. Emmanuelle

    August 10, 2021 at 2:08 am

    Hi, Great idea…going to try them in my class. What are the sponges for ?

    Reply
    • Barbara Rucci

      August 14, 2021 at 8:25 am

      The damp sponges are for drying your brush off in between colors.

      Reply
  27. Kelly Garcia

    March 9, 2022 at 11:30 am

    Thank you so much for this idea! We are starting painting in my art class and I was just looking at the prices of easels and wondering where I was going to store 34 of them! This will save so much space!

    Reply

Leave a Reply Cancel reply

Your email address will not be published. Required fields are marked *

Primary Sidebar

The Creativity Project
RESOURCE FOR TEACHERS
Join our course!
Your subscription could not be saved. Please try again.
Your subscription has been successful.

Yes! I want to raise thoughtful and creative children. Send me more inspiration, please!

artbarblog

i make things✖️
creativity facilitator✖️
design as a lense✖️
author✖️✖️
mom✖️✖️✖️
blog at artbarblog✖️
teacher resources ⬇️
@the.creativityproject

I have been thinking lately about so many big idea I have been thinking lately about so many big ideas. They seem to be stuck, though, in the cogs of my brain. I need to articulate and connect these ideas together, but I can’t find the right words, or medium. It feels like trudging through thick mud, and then making the choice to set up camp in the muddy place. Maybe this is always what motherhood + living a creative life will be. And I am ok with that, too. Life is mucky, and even though I crave clarity, I am also acutely aware that this is why I also crave art. Music, books, museums, film, gardens… these are the mediums humans turn to when they need to find connection and, if we are lucky, clarity. But I feel more protective of my human-centered ideas these days and less willing to share them in spaces like this where they are open source. I don’t even know what is real sometimes. And how am I contributing to this landscape of creative and intellectual robbery. I think I am headed in a different direction but I don’t know what that is yet. Meanwhile, I am camping in the mud and looking for beauty where I am. 

Some moments new and old, lately…

1. Painting at my easel, age 4 when we lived in England before moving to the US. 
2. I tried making a video of motherhood on mother’s day inspired by this song 🌙 but never finished. 
3. Planting dahlias 🌸
4. Year 2 of my veggie garden. It is not going well. 
5. We diagnosed our garden problem as not enough sun so cut down a tree to give the sun a little path but then the sun moved. Also failing at science 😳
6. When you see your habits in your children ❤️ 
7. My mom’s caretaker gave me a cake and now I am a whole year younger 🙏🏼
8. Thank you James for the treats, mom dreams of traveling to visit your bakery but this was the next best thing 🥐
9. Finding 50 bucks in jeans from 20 years ago 👏🏼 Always check the pockets!
10. The newly graduated makeup artist with her kit off to a job 💋 
11. When the birthday kid isn’t home it’s too sad. must make art. 
12. When I am so dumb and share it on the internet 🙃
13. My heart, my clarity ❤️
14. Another round of silkscreening! Things are happening. 
15. MUA by Ava, and hanging out with the help 😍
16. Reminder.
Happy Earth Day! Can we agree that every day is Happy Earth Day! 

Can we agree that every day is Earth Day? The older I get, the more I change my habits to be kinder to this beautiful planet. Lately, seeing the photos from Artemis II of Earth from space has really moved me to make even more planet-friendly choices. Here are some things we do at home, and of course, we could always be better, but I also think small changes are more doable and sustainable, and if millions of us did just one of these things, it would make a difference.

Ok, here goes! My hope is that someone reads one of these actions and thinks, I can do this! We cannot reverse the melting ice caps, but we can stop further global warming… humans can do this if we work together. It starts small and is community-driven, so share this with friends!

1. Eating less meat, eating more veggies (this is also called eating low on the food chain). A vegetarian or vegan diet is a low-carbon diet. Did you know switching to 2/3 vegan reduces your carbon footprint by 60%? 
2. Grow our own veggies. Save on emissions and packaging, and find joy in gardening.
3. Less food waste. Eat leftovers, clear the fridge.
4. Buy less. Buy local.
5. Repurpose, fix, mend, thrift.
6. Make homemade gifts.
7. Drive less, fly less. (This one is harder, but being conscious of it is really important.)
8. Moderate, steady thermostat settings can save so much energy. Try 67/68 F in the winter and 72/73 in the summer and don’t touch it.
9. No pesticides on our lawn. It may not be pretty, but we have never had a beautiful lawn, and I’m fine with that. We also live on a river so the thought of polluting that water so I can have a perfect lawn is crazy.
10. Using non-toxic cleaning products or making our own from vinegar.
11. This year, we will do “no-mow May” to promote biodiversity, help the soil, and reduce emissions.
12. Vote for candidates who take climate change seriously!

Add some things you are doing in the comments. This is a judgment-free zone, so no preaching! But for real, we all can do a little bit better. 

The blog post about these signs is on artbarblog.com, link in bio!
New blog post! It’s about time I share my favorite New blog post! It’s about time I share my favorite materials that I bring to the library. Read the post for links and tips for how to pair these materials to foster deep engagement. Children have always needed time in childhood to use their hands to make things and play, but now more than ever, the skills they develop through these experiences are imperative for their future well-being and success. I’ve been reading everywhere about children’s “lost skills” in this new ed tech world where screens have replaced so much hands-on learning in the classroom, even as young as preschool 😞 Communication skills, flexible thinking, regulating emotions, building empathy for others, innovating, even core strength and pencil grips are a struggle. Offering time and materials for making things and playing with ideas should not be a challenge; it should be as essential as filling bodies with fresh air and food. Play is how children learn! Anyway, I hope this post will inspire you to collect some things for making and maybe even join our Materials Matter course over on @the.creativityproject so that you, too, can become an expert at cultivating creative thinking through art making!
It’s almost impossible to concentrate or sleep or It’s almost impossible to concentrate or sleep or work or enjoy anything these days. I know joy is resistance, art is resistance, kindness and empathy are resistance, and I try and practice all of these things every day, and also boycotting and shopping local and volunteering and making calls and checking on my neighbors and bartering and keeping our big tree lit for the community. And still, it doesn’t feel like nearly enough. I know we probably all feel this way. And maybe the collective small things really do add up to bigger movements, I don’t know. It’s Sunday and my mom is in the hospital again and I miss my one at college and I had such a bad dream last night. My headspace is not in cheerleader mode which is my usual default. And yet… going through my camera roll to find photos of things I made did actually help today. And I have made a plan for future things to make. When I wake up in the middle of the night, the way I get myself back to sleep is by envisioning this one big installation idea I’ve had for years, it takes place in a forest and involves textiles. So maybe 2026 is the year for me to bring this to life, or begin the process. I think about this quote, and it helps, too: When you make art, you rebel against a world that fears vulnerability. Ok, I’m better. Thank you for listening 🤪❤️

Ps: It weighs on me that Meta should be part of the boycotts. If anyone has any ideas for building community and sharing somehow somewhere else let’s discuss.
Follow on Instagram

Categories

Archives

Copyright and Reposting

All content on this blog is copyright and owned by Art Bar Blog unless otherise stated. I would be flattered if you wanted to use an image from one of my posts! But please, ask me first. I would also ask that if it involves DIY instructions with a list of supplies that you don't repost any of that stuff because then nobody would have a reason to click back to my original post!

Footer

  • Facebook
  • Instagram
  • Pinterest

About Me

There are two things that I'm passionate about: Children + Art. As an art teacher, author, graphic designer, and mom to 3 creative thinkers, I get to explore my passions every day! Learn more...

I am dedicated to keeping your information safe. Please review my Privacy Policy.

Recent Posts

Copyright © 2026 · Foodie Pro & The Genesis Framework