I’ve been a wee bit obsessed with weaving lately, ever since May when I saw these beautiful pieces made by Rachel Denbow. After seeing cardboard looms all over Pinterest this summer, which totally fueled my fixation, I decided to make some looms myself for my little campers.
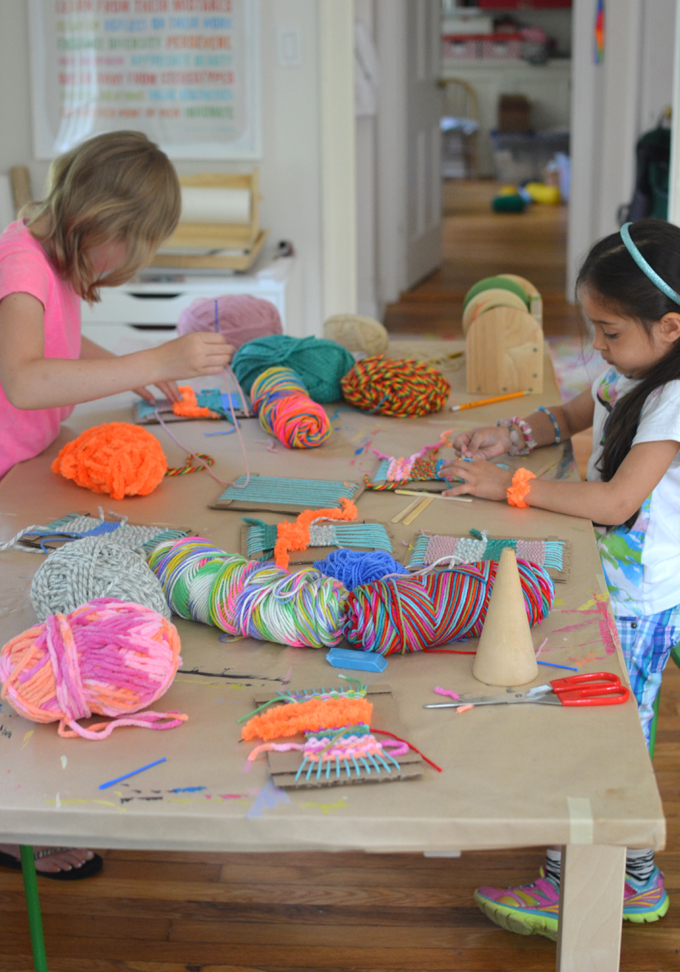
This week I had five girls at art camp ranging from ages five to seven (and one 14 year old helper extraordinaire). Since I had never tried weaving with young children, I wasn’t sure what would happen, or if they could even handle weaving, but I decided to just give it a try.
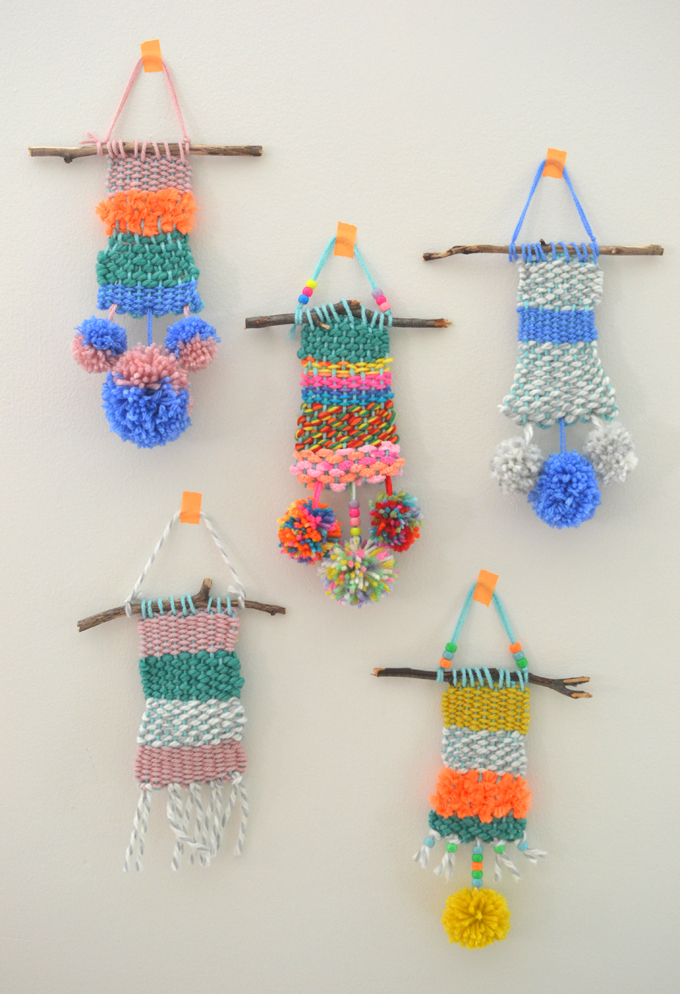
Turns out, they LOVE WEAVING! My daughter and I did it with them so it was complete side-by-side, art-making bliss. I love that in the end, you couldn’t even tell the difference between my weaving and theirs (I’m only showing you theirs in this post). In fact, I loved theirs even more than mine because they were way more free with their choices and their technique. (Isn’t that true for most art making? Those little ones are so unhindered by vision and plans. They just enjoy the process.)
This post contains affiliate links. Thank you for your support.
Here’s what you’ll need to make your own looms and weavings:
~ A piece of cardboard about 6” x 8”, and two strips for the top and bottom.
~ Exacto knife or scissors
~ Ruler
~ Yarn (I buy mine at Michael’s, but these little guys are super cute for a project like this)
~ Pom-pom maker (optional)
~ Pony beads (optional)
~ Twigs
How to make the loom:
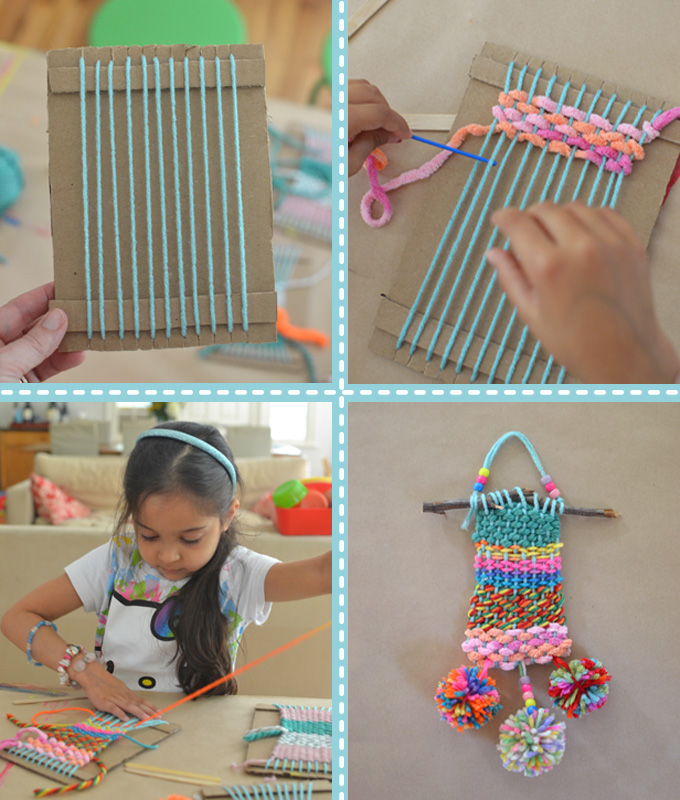
1. Take your ruler and put it across the top of your piece of cardboard, about 1/2” from the top. Draw a straight line with a pencil. Now measure in 1” and make a hash mark. Continue on and make 12 hash marks about 3/8” apart all across the top. Do the same at the bottom. You can space them out however you would like, but this is just what I did for my looms.
2. Using an exacto knife, or scissors, cut along each hash mark, stopping at the 1/2″ line.
3. Glue on the strips of cardboard so that the top of the strip aligns with the 1/2″ line (strips are about 1/2″ wide).
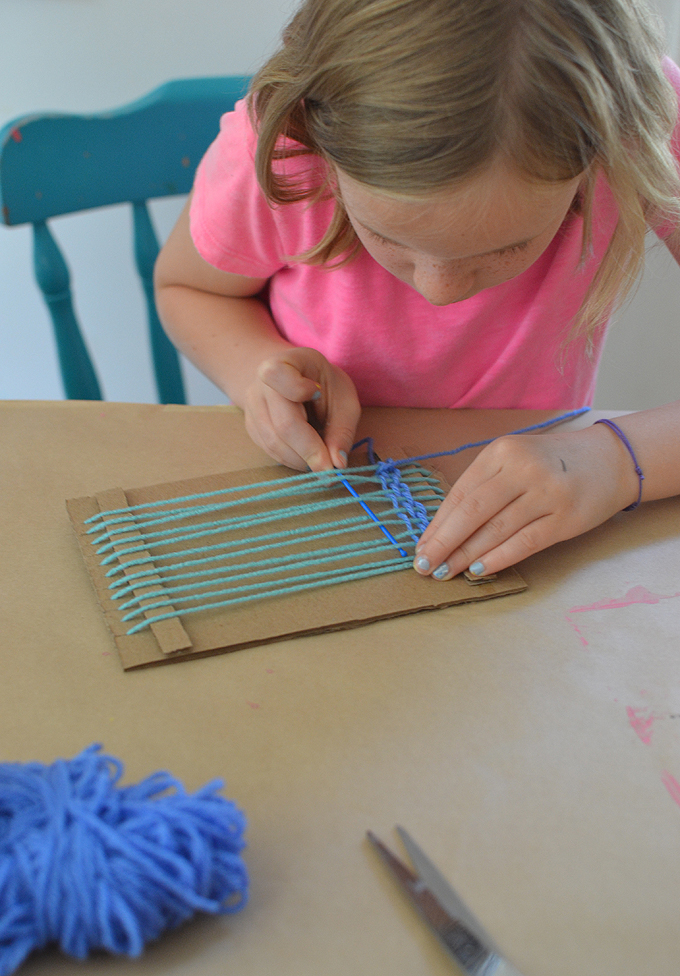
4. Cut 12 pieces of yarn and thread each notch, making sure to leave a tail of about 3” on the back. Tape these ends to the back with scotch tape. Make sure the threads are fairly tight (but not so tight that it’s stretching the yarn). These vertical threads are called the warp. You have your loom!
How to weave:
1. Cut a piece of yarn about 2 feet long. Thread it through the plastic needle and then tie a knot at the top of the needle.
2. Starting with the first warp thread, slide the needle underneath and then up over the next thread, and then back under the third thread, and so on. Use this under-over pattern until you get to the last warp thread. When you get to the end of your first row, pull it through all the way, leaving about a 3” tail. You can tie this tail in a knot around the first warp thread to secure it for the little kids, but after they weave two rows it won’t be in danger of coming out anymore.
3. For your next row, go back the other way by doing the opposite over-under pattern as you did for the first row. (If you go under and over in the same way as the first row you will be undoing what you just did. This mistake does happen with the littles so make sure to check on them before they begin each row in the beginning, Eventually they get the hang of it).
4. Once you have a few rows, use your fingers to push up the weft yarn so that it’s snug. Be careful not to pull too hard on the weft yarns after each pass through because your weaving will start to cinch in at the middle. Of course, this did happen to all of us, but I thought I should warn you anyway! First time weaving mistakes.
5. When you are done with your first color yarn, or if you decide you want to switch colors, simply end it with about a 3” tail remaining. It might start to look sloppy with lots of tails hanging out all over, but don’t worry ~ all of them will be taped to the back at the end.
6. Start the next colors in the same way you started the first, leaving a tail of about 3”.
7. When you get to the end, just cut off the yarn that you are working with. Not to sound too redundant…but don’t forget to leave that tail. 🙂
Taking your weaving off of the loom:
1. When you are finished, undo the scotch tape in the back and carefully pull off the warp threads. I didn’t take any pictures of this process for some mysterious reason, but it’s fairly straightforward…it’s just that you have to be careful because the weft threads could come off easily.
2. When your entire weaving has been pulled off of the loom, tie all of the warp threads together at the ends. Tie 1 & 2 together, 3 & 4 together, and so on. You should have six knots at the top and bottom. Double knots.
3. At this point, it’s time to deal with the tails coming out of the sides. The reason to leave the tails on the longish side is so that you can thread them through the needle, and then gently weave them through the back a few times before trimming them. If you don’t want to take this extra step, you could just tape the tails to the back with masking tape.
4. Also use masking tape to tape down the top and bottom warp threads to the back of your weaving. (If you don’t want a messy looking back, you can also weave the bits back through instead.)
Finishing your weaving:
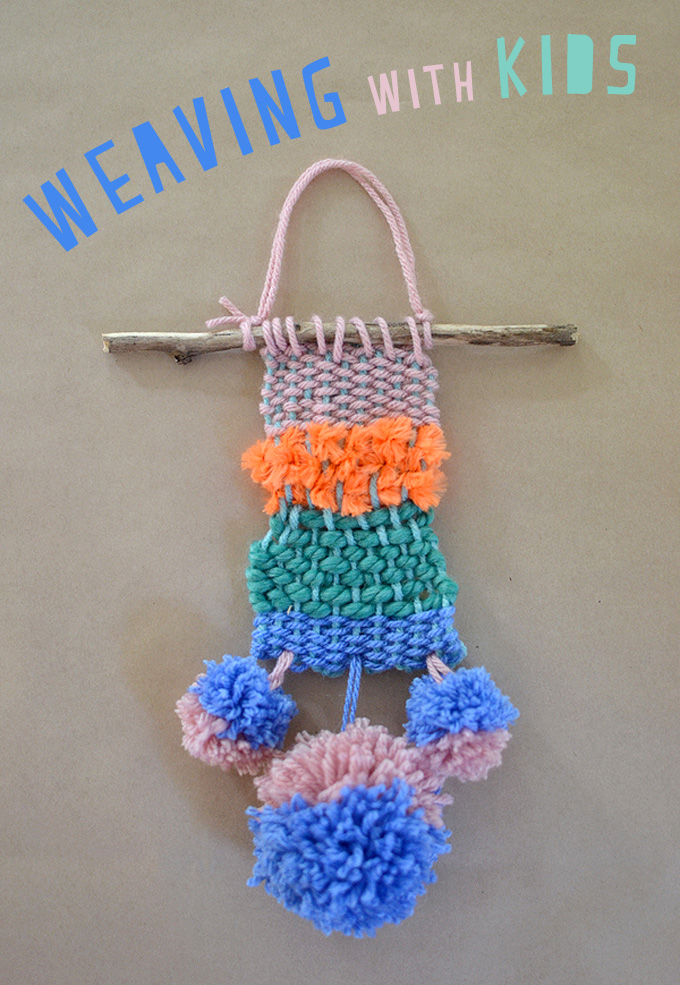
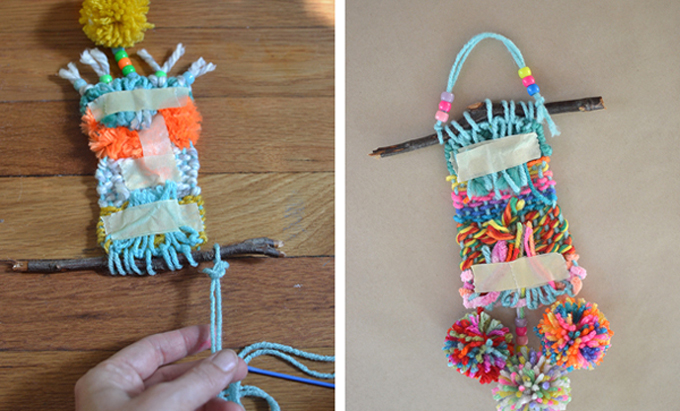
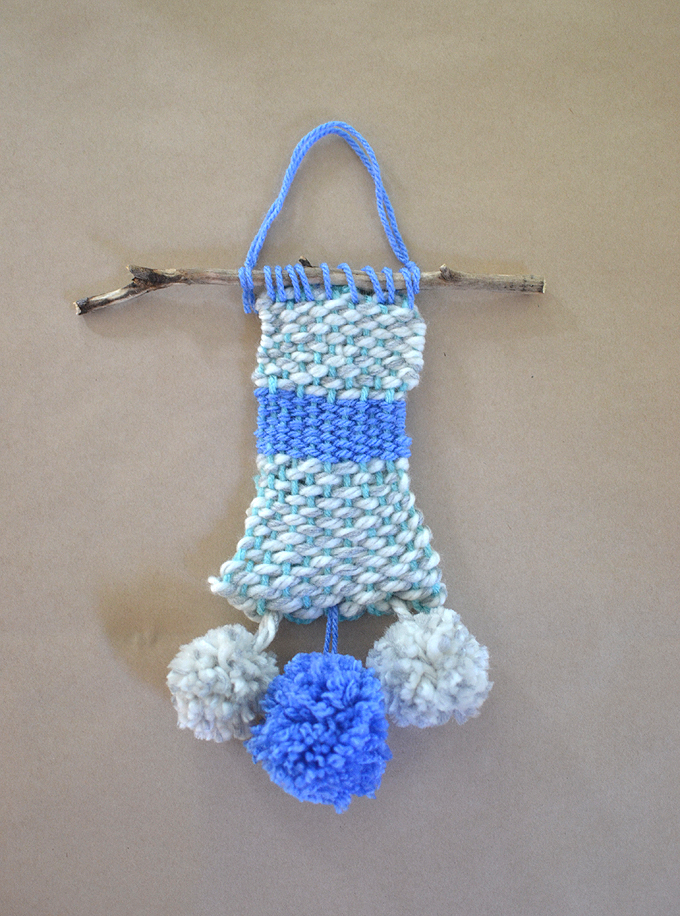
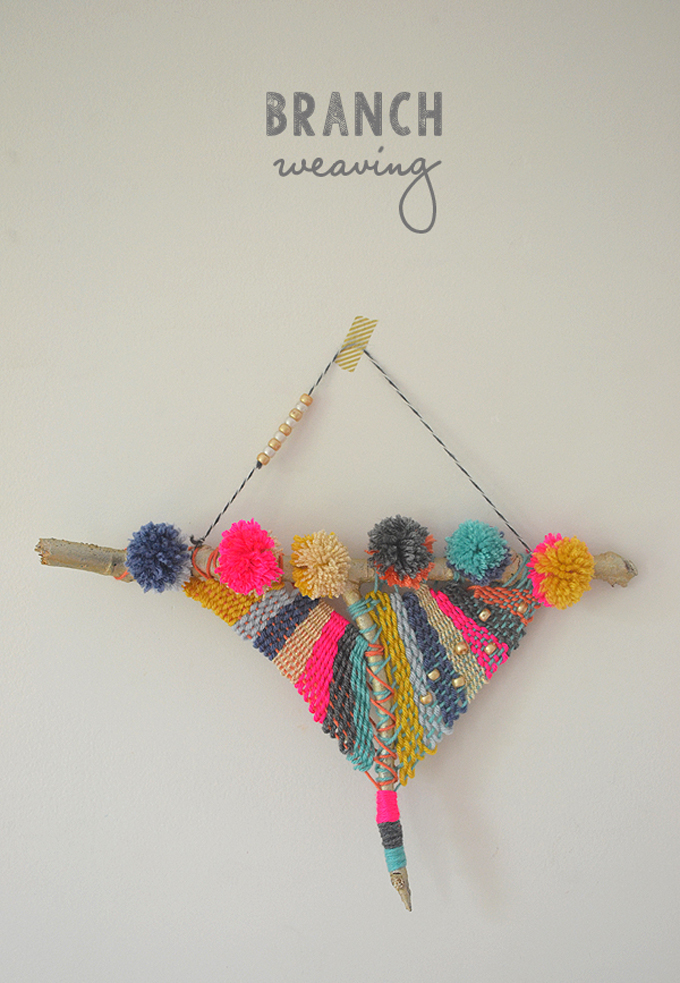
1. Technically, you are now done with your weaving. Hooray! But if you want to embellish with pom-poms and beads, and hang it on a twig, then read on. Just a note: The kids didn’t do any of the finishings, except for the pom-poms. I did all of the taping, beading (kids picked out their colors) and attaching it to the twig. They watched as I did it all, but it was too finicky for their little hands.
2. We made our pom-poms with a pom-pom maker (I highly recommend these things…they are good for life!). But you can also do it the old fashioned way: around your fingers. Here is a good tutorial for that way. Don’t forget to leave a longish tail with the piece of yarn that you use to tie the pom-pom. You will thread this tail through the needle and then attach it to your weaving by going through the bottom (front to back) and then taping it on the back. You can add beads to your pom-pom before you attach it to your weaving.
3. To attach the weaving to the twig, cut a piece of yarn, about a foot long, and string it through the needle. Starting on one end, loop the threaded needle through the top of the weaving and around the twig, wrapping the twig all the way until the end. Tie knots on either end, then trim and use masking tape to tape the ends to the back.
4. Lastly, to attach the hanger, simply cut a piece of yarn about 18” long (this will be trimmed, but better too long than too short), and fold it over. Loop the folded end around one side of the twig and make a knot. If you want to add beads, now is the time. To finish off the other side just tie it around the twig in a double knot and trim.
I know there are like a million steps, but the steps for the kids are pretty simple and fun. It’s the making of the loom and the finishing that involves some busy work on the part of the adult. I personally LOVE busy work…and I’m betting that if you’ve read this far, you do too.

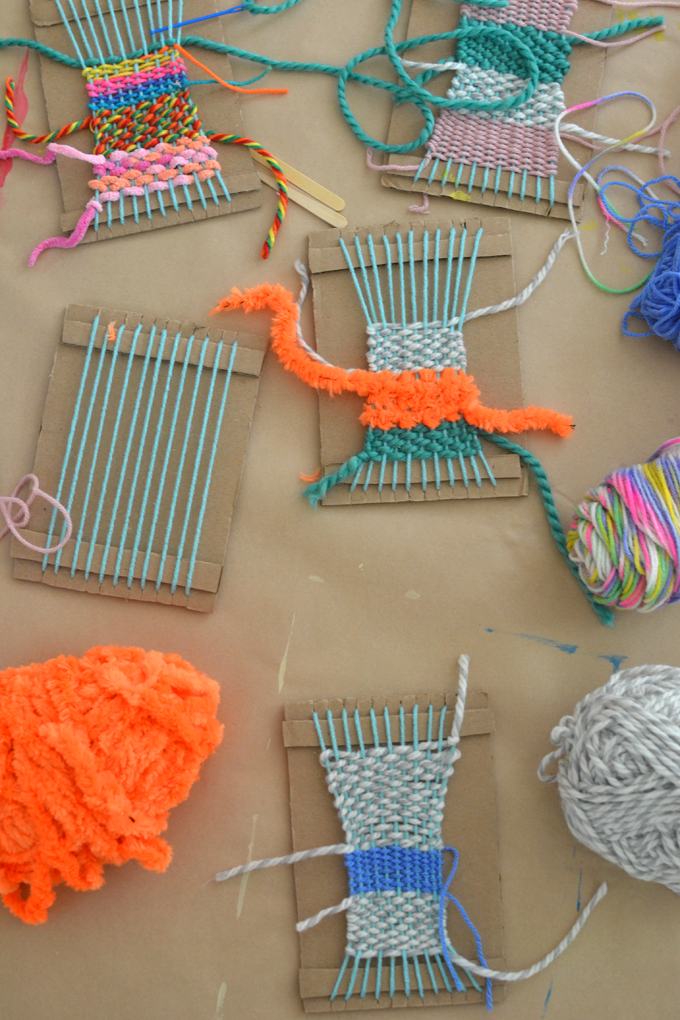
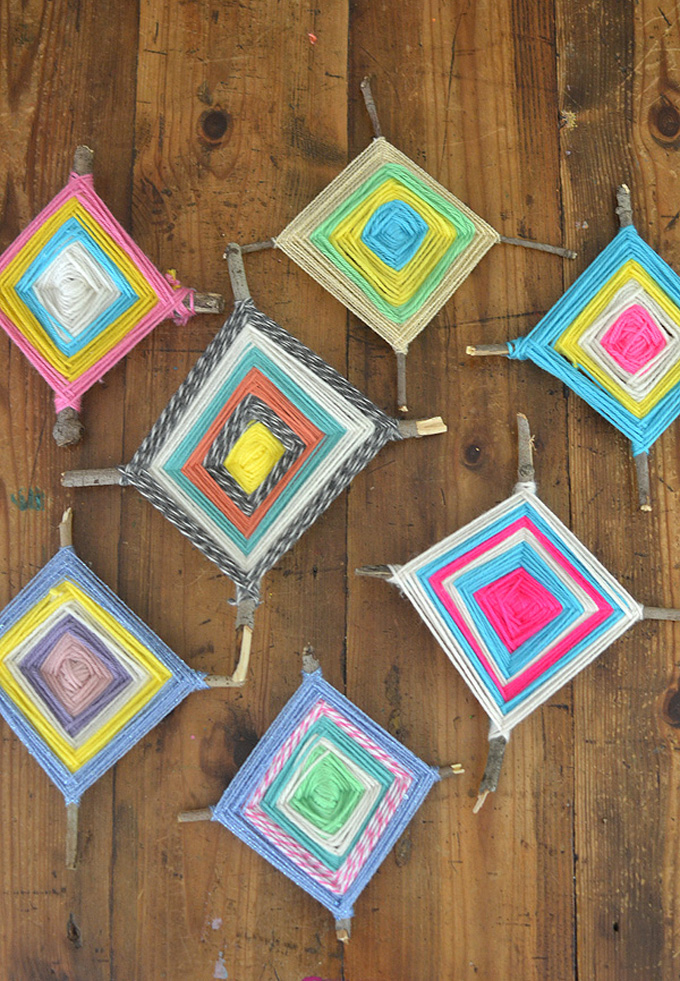
Here are some other versions that we did without pom-poms and using popsicle sticks. I didn’t have time to collect twigs for this group and we didn’t have time for pom-poms, but they are still so cute!!
One thing I forgot to mention is that this project is a great way to introduce some new vocabulary for the kids. They learned warp & weft, and they learned about woven fabric vs. knit. We talked about how so many things in their world are woven: the shorts they are wearing, their sheets and pillows, towels, tablecloths. It was such an eye opener and so fun to see all of this new knowledge sink in.
I hope you try weaving, it really is so cool.
xo, Bar
– – – – – – – – – –


stop it. just stop it. it’s just too good!!!
you are funny. thank you!!
These turned out so fantastically! The kids must feel like magicians! What a fun class and completely success! You’re really inspiring these artists to weave rainbows, Bar! Love them.
thank you gina! they were so happy with them…big smiles. i think kids are amazing and will almost always rise to the challenge! xo
I am obsessed with weaving too and I think this just made me more obsessive! AMAZING!!!!!!!!
thanks ana! it would be so fun to do a weaving crafts night for grownups, don’t you think? if only we lived closer! xx bar
So beautiful!! I’m going to show this to my daughter, she is six, and I’m sure she will love to give it a try. Thanks for sharing!
thank you lola…i hope you both try it! make a loom for each of you, it’s a wonderful side-by-side project 🙂 xo bar
Amazed by your beautiful + textile post on weaving today! Thank you for bringing weaving back in a modern + stylish + fun direction with all your fabulous colors + textures + exciting additions! Inspiring!!!
thank you ami!! so nice of you. it was really interesting to watch the little kids get so into their weavings, it’s a form of art and expression that i think gets overlooked. i’m sure you’ve done weaving with your kids, too, and are as amazed as i am! xo bar
What a great post! I have been looking for simple, kid friendly weaving crafts! And what a fun craft for kiddos to do! To make their own, colorful wall hanging or tapestry! How fun. Love that.
-Courtney from Barefoot in Blue Jeans
barefootinbluejeansblog.com
thank you so much courtney! it’s so interesting that you mentioned the word tapestry. it wasn’t something i talked about with the kids during this project, but i have always been in love with tapestries ever since my art school days. you have reminded me to explore the world of tapestries with the kids the next time we weave!! x bar
This is lovely, my kids will love doing this craft, fab idea x
its fun and being a kid is fun doing it my mom is helping me with it
I wanted to ask, how do I go about hanging these on a bedroom wall? And what to use.
Thank you!
hi yesi, thank you for stopping by! we hung our weavings with a piece of tape. i used washi tape, or paper tape, to make it pretty. but you could use any tape. you could also hang it on a nail, or depending on where you live, your hardware store could have plastic little hooks that stick to your wall. i hope this helps! xo bar
These are so awesome…I would love to do weavings with my 5 and 6 year old grand kids! What wonderful Christmas gifts they would make!! Thanks so much for sharing this. Would you mind if I “pinned” this idea OR shared it in a blog post. I need help remembering where I find things these days… : )
hi marie, i’m glad you found me! your grandkids would LOVE this project. we are using our looms all the time. and yes, wonderful and perfect for Christmas! i would be happy for you to share, thank you for asking I appreciate that so much. please just don’t give away the DIY directions or supplies and link back to me. thank you!!! oh, and if you do make these with I would LOVE to see a photo. so please share! xo bar
Love this! I am so glad that the pin I had “repinned” on Pinterest was reported as copyright infringement (by you, I assume), because I clicked through and finally tracked your actual website down. I’ve repinned now straight from this post. You have a beautiful blog and I applaud you for being diligent about copyright. I was lazily clicking “Pin it” and don’t usually do that without clicking through first. I’m glad I found you!
thanks so much for this, cari…and i’m glad you tracked me down! thank you for pinning from the original source, i appreciate it so much. and welcome to the blog!! xo bar
I showed my three children your beautiful woven creations and they were so excited to make their own. Thank you so much for the beautiful inspiration. Your creations are gorgeous. I am in the process of writing a blog post about our weaving experience. I will link to you for instructions and supplies. If you have a minute and you are interested, the post will be up later today at http://blog.creativeplaycentral.com.au/
wow, thank you elise!!! i am happier than you know that my post inspired you and your children. i can’t wait to see what you did!! thank you so much!! xo bar
Hi Bar 🙂 I have just published the blog post. Thank you so much for the inspiration. My children have become quite addicted to weaving. I think there will be a few woven creations given to some family members this Christmas! The link to the blog post is: http://blog.creativeplaycentral.com.au/woven-bookmarks/
i love it!!! it’s so happy and i love the photos of your children working. i love how you used alternating colors for the warp threads. and i love that they are bookmarks!! thank you for sharing my post and even more thank yous for making the weavings!!! xo bar
Bonjour Bar,
I Love your blog. I am a fan of you.
I try last week your weaving tutorial and I write a post for Les enfants Terribles Mag & for me too!
Here the links
http://www.enfantsterriblesmag.com/blog/diy-weaving-with-for-the-kids912015
http://www.lamaisondeloulou.com/blog/2015/01/10/diy-weaving-for-with-the-kids/
Have a great weekend,
Love,
Marie-Laure
thank you so much, i just followed you on all social media 🙂 your blog is fantastic too, i love it!! and thank you for linking to my blog from your post i really appreciate that. i am reading a book right now and the main character is named marie-laure! such a coincidence. i hope you enjoy your weekend, although very cold…it is beautiful. xo bar
I loved your post which I stumbled upon whilst searching for children’s weaving on Pinterest. I loved your use of tape to secure the ends on the piece and have championed your blog on mine, so any of my readers can click back to you 🙂
thank you for sharing my blog on your blog, i appreciate the link back very much. your weavings came out beautifully! xo bar
This is beautiful!
thank you melissa! it’s really one of my favorites, and something we circle back to in art class often. now that i know kids of every age can do it (even the 4yr olds)! thanks for leaving a comment! xo bar
These are beautiful! I have the special pleasure of getting to teach art in my son’s kindergarten class every week. Do you think this is something that 20 kids could do at once or would it get frustrating for little ones? Thanks for letting me know!
hi jennifer, thanks for stopping by! I think 5yr olds could absolutely do this, but you would need to have either on adult per 4 kids, or do it in smaller groups. once they get it, they are off. but starting them out takes a little bit of time because you have to teach them the concept of over/under, and then doing the opposite on the way back. let me know if you try!! xo bar
its a very nice ideaaaa
Thank you for great ideas, it’s super.
Hi! I’ve loved exploring around your blog (I just happened upon it while on Pinterest). I have also loved all of Rachel Denbow’s weavings. This is such a great adaptation for kids! Thanks for some great ideas 🙂
thank you brooke! so glad you clicked over to my blog, very happy to have you here…a kindred Rachel Denbow fan 🙂 xo bar
My daughter would just LOVE this! I’ve got to try it with her! 🙂 Lisa
we honestly do it all the time, and it is always a hit. let me know how it goes! xo bar
Oh I love your page!! So colourful! Such a pity the kids are asleep yet – I just could start make some things from your page wright now! But I pinned a lot and we´ll do!
Why, thank you so much, you just made my day! You could always wake the kids 😉 Do let me know which ideas you make, I would love to know what inspired you. Thank you doe leading a comment! xo Bar
I love this simple project that you’ve done with the kids. I would like to use some to the pictures for my summer camp. No instructions would be shown. But I would like your permission to use this project!
hi Michelle, thank you for asking to use my photos, I appreciate that. yes you can use one or two photos and then link back to me for the rest and for the tutorial. have fun! barbara
Amazing stuff
Beautiful is hand made I like to much
Hi! Thanks for this great idea, i’m going to make this with my kids.
Do you know craftkitchen.nl is using your instructions and photo’s?
Thanks for letting me know Sjouk! I contacted them and they took it down. I love that you are looking out for me, I am very appreciative. xo Bar
Oh wow, this is a wonderful project that I’m so going to use with my first graders.
Thank you so much.
oh I love hearing that, Azra!! t’s a perfect one for first graders. please let me know how it goes!! xo Bar
Great post! We’ll be using this to earn our Textile Arts badge this weekend with American Heritage Girls. Thanks for the clear instructions. I know my girls will be so excited.
So happy to inspire!! Hope the weaving went well with the girls! xo bar
Hi, love that you’re spreading the love of weaving around. I’ve been doing it with children for about 10 years on and off and they all love it, once they get the rhythm. I have to say though that it’d be great if you teach them to finish the tails properly 🙂 Just thread one tail onto a large eyed needle and weave in and out, making the tail finish on the back side of weaving. The tape you used to finish will eventually fall off and then a lot of hard work may fall apart. There is also a way to attach the warp(up and down threads, I always mix up the names, sorry if I did!) but it’s a bit hard to describe so you could probably google it. It’s a way of wrapping thread around so that it’s one continuous thread rather than one for each warp. Love your posts by the way!
I WOULD LIKE TO DO THIS PROJECT IN MY AFTERSCHOOL CLASS WILL YOU ALLOW ME . MY E-MAIL IS dir50pender@aol.com
Of course, Eva! Feel free to do any projects from my blog. Thanks for asking, and have fun! xx Bar
I hope my English translation will be correct (I’m french!) :
Hello !
I found the creative idea for the kids really great!
To prepare the gifts of teachers, I proposed to my children to realize this pretty object of decoration.
They loved it and most of all, are proud of it.
I show their creations on my blog. So I took the opportunity to present your blog.
You can find it here: http://douxreves.fr/blog/category/la-cabane-a-idees/
I did not recover the image of the tuto out of respect for your work. So I inserted the link of your article, if my readers want to know more.
Thank you for the idea!
Oh this is just too cute! I just went and bought most of the materials (thank you for the amazon refrences) and can not wait to introduce this to my almost 5 year old daughter! She absolutely loves art and doing things on her own (we have hit the independent, I can do this by myself mom stage) so I know she will be so proud of of the finished piece! Thank you for the easy to follow instructions. I just subscribed to your blog so Im sure we will be trying many more of your wonderful creative ideas!
Loving your emails so much! Between them and the #100daysofartbar Insta prompts (I’m @raising.kinley on there 👋🏼), you’ve made this homeschoolin’ momma’s life incredibly easy! I think we’ll give these gorgeous weavings a try today 😍 Thank you Bar, and extra thanks for the super detailed instructions!
Thank you for this, I want to do weaving with my class of 30 so this is a BIG help! May I ask, the last picture, on the crossed sticks, is this still weaving?
hi Dee, technically it’s not weaving, but it’s a good pre-weaving project to strengthen little fingers! good luck with your class, let me know how it goes! xo Bar
Thanks so much. I’m going to use this for a teenage girl pupil with fine motor skills issues.
Do you think they would be patient enough to weave scarves for themselves?
hmmm… good question! it depends on the age. maybe older kids would, but I find the younger ones are pretty tired after finishing these weavings. it takes a lot of small motor skills and concentration. good luck!! xx Bar
Lovely! I am wanting to do this with a class of fourth graders to learn about textiles. How long about dodbot take your kiddos to finish a project?
hi Sara – hmmm, I thin, 4th graders could do this project in about 1-2 hours, depending on how speedy they are. They would love this!! xx Bar
Great ideas!
Hola Eva, soy Angela y desde Argentina. Te agradezco la idea de trabajar estas manualidades. Son magníficas! Las voy a utilizar con mi nieta Lucila. Ella tiene 5 años y me observa tejiendo y quiere hacerlo a pesar de la dificultad, logra cada vez mejores resultados. Estas artesanías con texturas y ramas son ideales para que los resultados sean más satisfactorios para ella misma.
Hi Eva, I’m Angela and from Argentina. I appreciate the idea of working with these crafts. They are magnificent! I’m going to use them with my granddaughter Lucila. She is 5 years old and she watches me weaving and she wants to do it despite the difficulty, she achieves better and better results every time. These handicrafts with textures and branches are ideal for the results to be more satisfactory for herself.
Using this next week at a dance camp…each day is a theme and the crafts correspond. For our around the world day we will be doing folk dances and weaving for the craft!. Unfortunately I found this too late to get the plastic needles in time for the camp – I ordered off Amazon but alas they haven’t arrived :(. I’m going to try taping the yarn to toothpicks or small skewers that I’ll cut off the pointy end. Adds extra steps for sure but hopefully works! Please let me know if you have a different suggestion. Thanks!
hi Annie, I hope it went well!!! taping the yarn to a toothpick is a great idea, I hope it worked! xx Bar
Amazing ! its much better than colouring everyday. keep sharing such interesting ideas. Thanks
I know this is a post from ages ago, but you might love a loome tool, it’s a 5 in 1 tool which you can weave, make jewellery and make Pom Poms with, found your post looking for tutorials on the small weaving on it
I realize this is a post from a very long time prior, yet you may adore a loome device, it’s a 5 of every 1 apparatus which you can weave, make gems and make Pom Poms with, discovered your post searching for instructional exercises on the little weaving on it
Hi Barbara,
Love these adorable woven wall hangings. I was hoping to see a picture of the back of the cardboard after you got the warp lines on there. Would you happen to have a pic of that that?
Hi Morgan, the ends are cut and taped across the back. I hope this helps! ~ Bar